| Last Modified: 08-28-2024 | 6.11:8.1.0 | Doc ID: RM100000000VJUO |
| Model Year Start: 2016 | Model: Sienna | Prod Date Range: [12/2015 - ] |
| Title: SEAT: AUTO ACCESS SEAT SYSTEM: INITIALIZATION; 2016 - 2020 MY Sienna [12/2015 - ] | ||
INITIALIZATION
1. INITIALIZING POSITION INFORMATION
HINT:
Buzzer pattern (See page
![2016 - 2020 MY Sienna [12/2015 - ]; SEAT: AUTO ACCESS SEAT SYSTEM: SYSTEM DESCRIPTION](/t3Portal/stylegraphics/info.gif) ).
).
(a) Initialize position information.
NOTICE:
Conduct initialization with the rear seat No. 2 assembly (Passenger-side third row seat) in the seating position. Otherwise, the seatback of the auto access seat may interfere with the rear seat No. 2 assembly and damage may result.
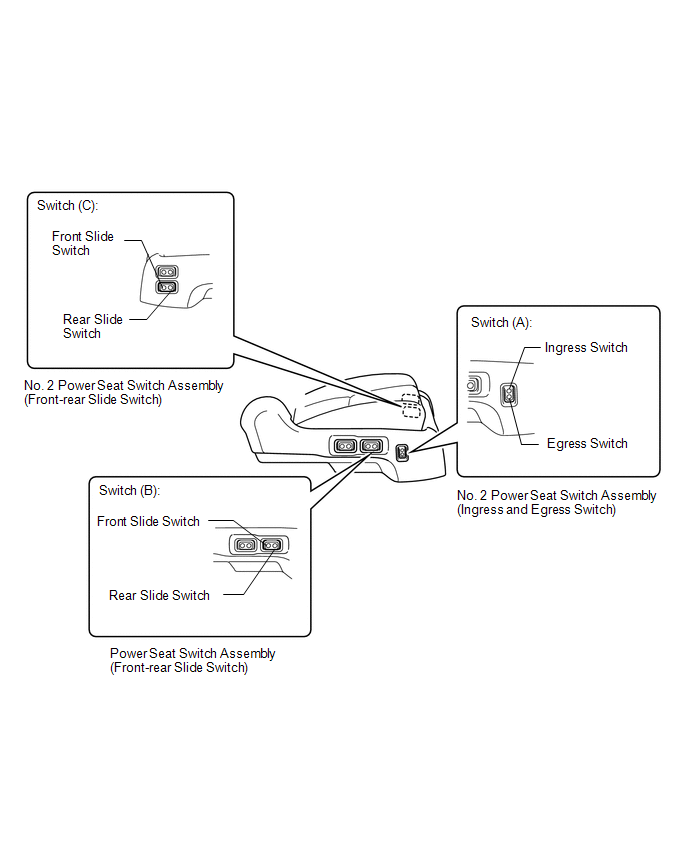
(1) Press and hold the ingress switch or egress switch of switch (A).
(2) With switch (A) depressed, press and hold the front slide switch or rear slide switch of switch (B) or (C) for 10 seconds to enter service operation mode, and confirm that buzzer (A) sounds.
(3) After buzzer (A) sounds, turn all operated switches off.
(4) After turning all operated switches off, perform either Operation A or B below within 10 seconds.
|
Operation |
Operation Switch |
|---|---|
|
A |
Ingress switch or egress switch of switch (A) ON 4 times → front slide switch or rear slide switch of switch (B) or (C) ON 4 times |
|
B |
Front slide switch or rear slide switch of switch (B) or (C) ON 4 times → ingress switch or egress switch of switch (A) ON 4 times |
(5) When position information has been initialized, buzzer (B) sounds.
(6) After buzzer (B) sounds, the system enters independent operation mode.
2. LIMIT SWITCH CALIBRATION
HINT:
-
Buzzer pattern (See page
).
-
Calibration is performed in independent operation mode. For the requirements to enter independent operation mode, refer to Diagnosis System (See page
).
- When performing calibration with the auto access seat in the ingress state, only origin point calibration for the swivel motor, front-rear slide motor, and reclining motor can be performed.
(a) Upper end and outward slide origin point calibration.
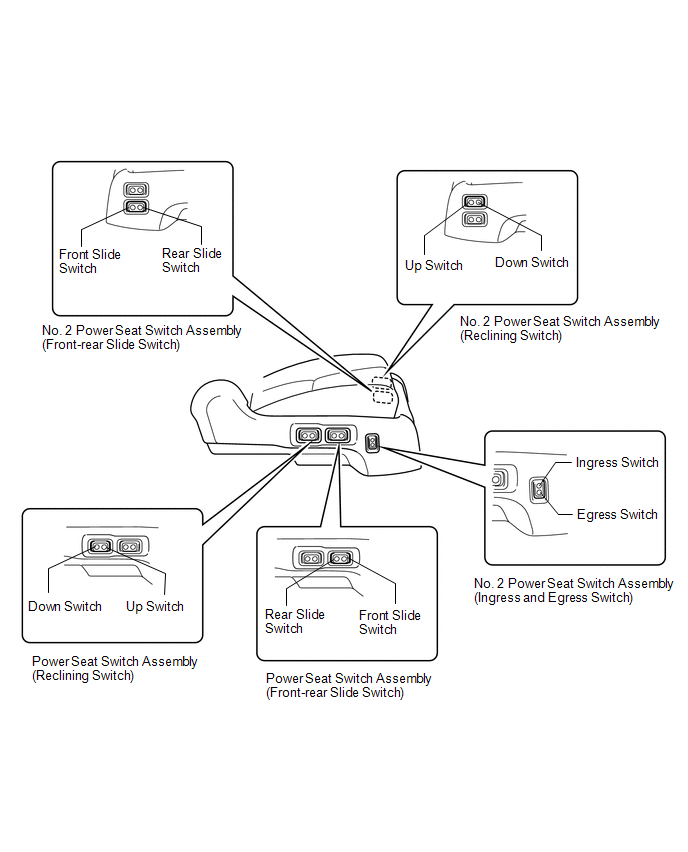
(1) Press and hold the ingress switch of the No. 2 power seat switch assembly (ingress and egress switch).
(2) Auto access seat moves in the following order: Up-down motor operates upward → upper end limit switch ON detected, buzzer (J) sounds → up-down motor operates downward → up-down motor stops → outward slide motor operates in the egress direction → outward slide motor origin point limit switch ON detected → outward slide motor stops → up-down motor operates upward → upper end limit switch ON detected, buzzer (J) sounds → up-down motor stops.
(b) Swivel origin point calibration.
NOTICE:
Performing swivel origin point calibration from an egress state can cause the seat cushion to bump against the vehicle body, so slide the seat approximately 50 mm (2.0 in) rearward before performing calibration.
(1) Press and hold the front slide switch of the power seat switch assembly (front-rear slide switch) or No. 2 power seat switch assembly (front-rear slide switch).
(2) Auto access seat moves in the following order: Swivel motor operates in the ingress direction → swivel origin point limit switch ON detected, buzzer (J) sounds → swivel motor stops.
HINT:
While swivel motor origin point calibration is incomplete, simultaneously operating the No. 2 power seat switch assembly (egress switch) and power seat switch assembly (front slide switch) or simultaneously operating the No. 2 power seat switch assembly (egress switch) and No. 2 power seat switch assembly (front slide switch) will cause the auto access seat to egress to the point where independent operation mode begins.
(c) Front-rear slide origin point calibration.
(1) Press and hold the rear slide switch of the power seat switch assembly (rear slide switch) or No. 2 power seat switch assembly (rear slide switch).
(2) Auto access seat moves in the following order: Rear slide operation → front-rear slide limit switch ON detected, buzzer (J) sounds → front-rear slide motor stops.
HINT:
While front-rear slide origin point calibration is incomplete, simultaneously operating the No. 2 power seat switch assembly (egress switch) and power seat switch assembly (rear slide switch) or simultaneously operating the No. 2 power seat switch assembly (egress switch) and No. 2 power seat switch assembly (rear slide switch) will cause the auto access seat to slide forward.
(d) Reclining origin point calibration.
HINT:
Until the reclining origin point calibration is completed, only reclining down operations can be performed when the reclining limit switch is ON, and only reclining up operations can be performed when the reclining limit switch is OFF.
(1) Press and hold the down switch of the power seat switch assembly (reclining switch) or No. 2 power seat switch assembly (reclining switch).
(2) Auto access seat moves in the following order: Reclining down operation → reclining limit switch OFF detected → reclining motor stops.
(3) Press and hold the up switch of the power seat switch assembly (reclining switch) or No. 2 power seat switch assembly (reclining switch).
(4) Auto access seat moves in the following order: Reclining up operation → reclining limit switch ON detected, buzzer (J) sounds → reclining motor stops.
(e) Buzzer (I) sounds when all auto access seat origin point calibrations are completed.
|
|
|