| Last Modified: 08-28-2024 | 6.11:8.1.0 | Doc ID: RM100000000VJPJ |
| Model Year Start: 2016 | Model: Sienna | Prod Date Range: [12/2015 - ] |
| Title: SUPPLEMENTAL RESTRAINT SYSTEMS: CENTER AIRBAG SENSOR ASSEMBLY: INSTALLATION; 2016 - 2020 MY Sienna [12/2015 - ] | ||
INSTALLATION
CAUTION / NOTICE / HINT
CAUTION:
Some of these service operations affect the SRS airbag system. Read the precautionary notices concerning the SRS airbag system before servicing (See page
![2016 - 2020 MY Sienna [12/2015 - ]; SUPPLEMENTAL RESTRAINT SYSTEMS: AIRBAG SYSTEM: PRECAUTION](/t3Portal/stylegraphics/info.gif) ).
).
PROCEDURE
1. INSTALL AIRBAG SENSOR BRACKET
(a) Install the airbag sensor bracket with the 4 bolts.
Torque:
17.5 N·m {178 kgf·cm, 13 ft·lbf}
2. INSTALL AIRBAG SENSOR ASSEMBLY
(a) Check that the ignition switch is off.
(b) Check that the cable is disconnected from the negative (-) battery terminal.
CAUTION:
- Check that the negative battery terminal is disconnected before performing the operation. Even an impact to only the airbag sensor will cause the airbag to deploy.
- Wait at least 90 seconds after disconnecting the cable from the negative (-) battery terminal to disable the SRS system.
(c) Install the airbag sensor assembly with the 3 bolts.
Torque:
17.5 N·m {178 kgf·cm, 13 ft·lbf}
NOTICE:
- Do not use a airbag sensor assembly that has been dropped.
- Do not subject the airbag sensor assembly to any impact or force.
- Check that the carpet does not interfere with the installation plane.
(d) Check that there is no looseness by shaking the airbag sensor assembly.
|
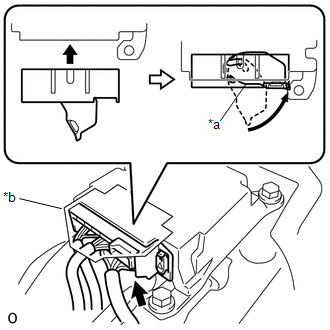
(e) Connect the connector holder to lock the lever. Text in Illustration
NOTICE: Check that the lever is locked. |
|
(f) Check that the drip-proof sheet has not been removed and does not cut into the connectors.
3. INSTALL REAR NO. 3 AIR DUCT
(a) Engage 6 claws to install the rear No. 3 air duct.
4. INSTALL REAR NO. 1 AIR DUCT
(a) Engage 6 claws to install the rear No. 1 air duct.
5. INSTALL INSTRUMENT CLUSTER FINISH LOWER CENTER PANEL SUB-ASSEMBLY
6. INSTALL INSTRUMENT PANEL FINISH PANEL END RH
7. INSTALL INSTRUMENT PANEL FINISH PANEL END LH
8. INSTALL INSTRUMENT LOWER CENTER COVER (w/ Console Box)
9. INSTALL INSTRUMENT LOWER CENTER COVER (w/o Console Box)
10. INSTALL CONSOLE BOX ASSEMBLY (for Slide Type)
11. INSTALL CONSOLE BOX ASSEMBLY (for Fixed Type)
12. CONNECT CABLE TO NEGATIVE BATTERY TERMINAL
NOTICE:
When disconnecting the cable, some systems need to be initialized after the cable is reconnected (See page
![2016 MY Sienna [12/2015 - 08/2016]; INTRODUCTION: REPAIR INSTRUCTION: INITIALIZATION](/t3Portal/stylegraphics/info.gif)
![2017 MY Sienna [08/2016 - 11/2017]; INTRODUCTION: REPAIR INSTRUCTION: INITIALIZATION](/t3Portal/stylegraphics/info.gif)
![2018 - 2020 MY Sienna [11/2017 - ]; INTRODUCTION: REPAIR INSTRUCTION: INITIALIZATION](/t3Portal/stylegraphics/info.gif) ).
).
Torque:
5.4 N·m {55 kgf·cm, 48 in·lbf}
13. INSPECT SRS WARNING LIGHT
|
|
|
