| Last Modified: 08-28-2024 | 6.11:8.1.0 | Doc ID: RM100000000VJF4 |
| Model Year Start: 2016 | Model: Sienna | Prod Date Range: [12/2015 - 08/2016] |
| Title: NETWORKING: LIN COMMUNICATION SYSTEM: LIN Communication Circuit; 2016 MY Sienna [12/2015 - 08/2016] | ||
|
LIN Communication Circuit |
DESCRIPTION
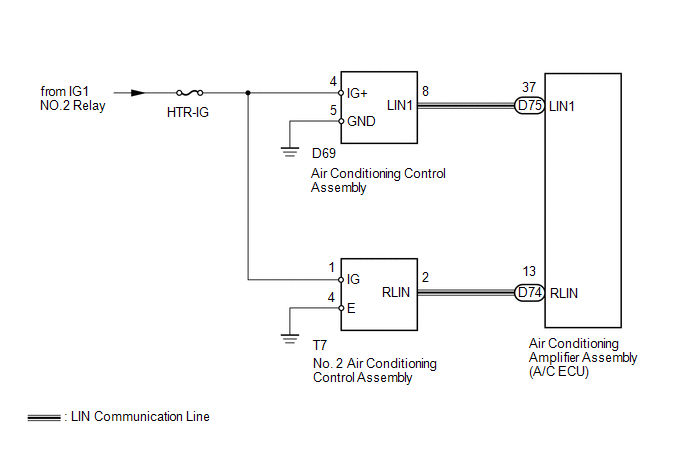
When a switch of the air conditioning control assembly or air conditioning control assembly No. 2 are operated, the air conditioning control assembly or air conditioning control assembly No. 2 uses LIN communication to communicate with air conditioning amplifier assembly. If a switch of the air conditioning control assembly or air conditioning control assembly No. 2 does not operate properly, a problem with the LIN communication between the air conditioning control assembly or air conditioning control assembly No. 2 and air conditioning control amplifier may be causing the malfunction.
WIRING DIAGRAM

CAUTION / NOTICE / HINT
NOTICE:
-
When using the Techstream with the ignition switch off to troubleshoot:
Connect the Techstream to the vehicle, and turn a courtesy switch on and off at 1.5 second intervals until communication between the Techstream and vehicle begins.
- Inspect the fuses for circuits related to this system before performing the following inspection procedure.
PROCEDURE
|
1. |
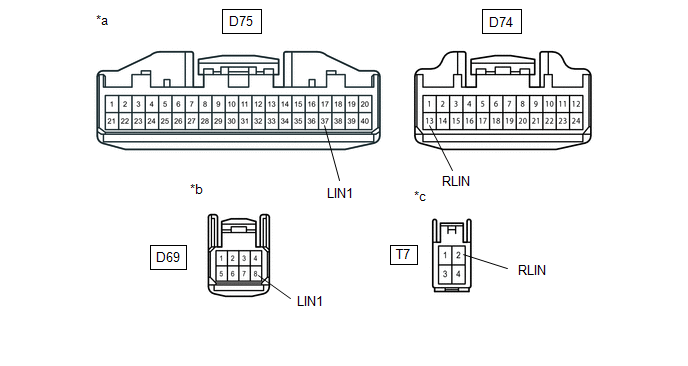
CHECK HARNESS AND CONNECTOR (AIR CONDITIONING AMPLIFIER ASSEMBLY (A/C ECU) - EACH ECU) |

Text in Illustration
|
*a |
Front view of wire harness connector (to Air Conditioning Amplifier Assembly (A/C ECU)) |
*b |
Front view of wire harness connector (to Air Conditioning Control Assembly) |
|
*c |
Front view of wire harness connector (to No. 2 Air Conditioning Control Assembly) |
- |
- |
(a) Disconnect the D75 and D74 air conditioning amplifier assembly (A/C ECU) connectors.
(b) Disconnect the D69 air conditioning control assembly connector.
(c) Disconnect the T7 No. 2 air conditioning control assembly connector.
(d) Measure the resistance and voltage according to the value(s) in the tables below.
Standard Resistance (Check for Open):
|
Tester Connection |
Condition |
Specified Condition |
|---|---|---|
|
D75-37 (LIN1) - D69-8 (LIN1) |
Always |
Below 1 Ω |
|
D74-13 (RLIN) - T7-2 (RLIN) |
Always |
Below 1 Ω |
Standard Resistance (Check for Short):
|
Tester Connection |
Condition |
Specified Condition |
|---|---|---|
|
D75-37 (LIN1) - Body ground |
Always |
10 kΩ or higher |
|
D74-13 (RLIN) - Body ground |
Always |
10 kΩ or higher |
Standard Voltage:
|
Tester Connection |
Condition |
Specified Condition |
|---|---|---|
|
D75-37 (LIN1) - Body ground |
Always |
Below 1 V |
|
D74-13 (RLIN) - Body ground |
Always |
Below 1 V |
| NG |

|
REPAIR OR REPLACE HARNESS OR CONNECTOR |
|
|
2. |
CHECK HARNESS AND CONNECTOR (AIR CONDITIONING CONTROL ASSEMBLY NO. 2 - BATTERY AND BODY GROUND) |
|
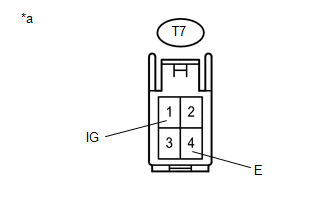
(a) Disconnect the T7 No. 2 air conditioning control assembly connector. |
|
(b) Measure the resistance and voltage according to the value(s) in the tables below.
Standard Resistance:
|
Tester Connection |
Condition |
Specified Condition |
|---|---|---|
|
T7-4 (E) - Body ground |
Always |
Below 1 Ω |
Standard Voltage:
|
Tester Connection |
Switch Condition |
Specified Condition |
|---|---|---|
|
T7-1 (IG) - Body ground |
Ignition switch ON |
11 to 14 V |
Text in Illustration
|
*a |
Front view of wire harness connector (to No. 2 Air Conditioning Control Assembly) |
| NG |

|
REPAIR OR REPLACE HARNESS OR CONNECTOR |
|
|
3. |
REPLACE NO. 2 AIR CONDITIONING CONTROL ASSEMBLY |
(a) Temporarily replace the No. 2 air conditioning control assembly with a new or normally functioning one (See page
![2016 - 2020 MY Sienna [12/2015 - ]; HEATING / AIR CONDITIONING: REAR AIR CONDITIONING PANEL: REMOVAL](/t3Portal/stylegraphics/info.gif) ).
).
(b) Check that the No. 2 air conditioning control assembly function is normal.
OK:
No. 2 Air conditioning control assembly function is normal.
| OK |

|
END (AIR CONDITIONING CONTROL ASSEMBLY NO. 2 IS MALFUNCTIONING) |
|
|
4. |
CHECK HARNESS AND CONNECTOR (AIR CONDITIONING CONTROL ASSEMBLY - BATTERY AND BODY GROUND) |
|
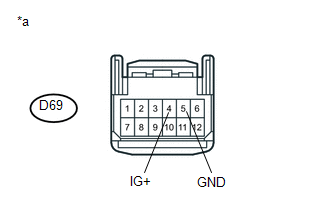
(a) Disconnect the D69 air conditioning control assembly connector. |
|
(b) Measure the resistance and voltage according to the value(s) in the table below.
Standard Resistance:
|
Tester Connection |
Condition |
Specified Condition |
|---|---|---|
|
D69-5 (GND) - Body ground |
Always |
Below 1 Ω |
Standard Voltage:
|
Tester Connection |
Switch Condition |
Specified Condition |
|---|---|---|
|
D69-4 (IG+) - Body ground |
Ignition switch ON |
11 to 14 V |
Text in Illustration
|
*a |
Front view of wire harness connector (to Air Conditioning Control Assembly) |
| NG |

|
REPAIR OR REPLACE HARNESS OR CONNECTOR |
|
|
5. |
REPLACE AIR CONDITIONING CONTROL ASSEMBLY |
(a) Temporarily replace the air conditioning control assembly with a new or normally functioning one (See page
![2016 - 2020 MY Sienna [12/2015 - ]; HEATING / AIR CONDITIONING: AIR CONDITIONING PANEL: REMOVAL](/t3Portal/stylegraphics/info.gif) ).
).
(b) Check that the front air conditioning control assembly function is normal.
OK:
Front air conditioning control assembly function is normal.
| OK |

|
END (AIR CONDITIONING CONTROL ASSEMBLY IS MALFUNCTIONING) |
| NG |

|
|
|
|


