| Last Modified: 08-28-2024 | 6.11:8.1.0 | Doc ID: RM100000000VIXN |
| Model Year Start: 2016 | Model: Sienna | Prod Date Range: [12/2015 - ] |
| Title: BRAKE SYSTEM (OTHER): BRAKE FLUID: BLEEDING; 2016 - 2020 MY Sienna [12/2015 - ] | ||
BLEEDING
CAUTION / NOTICE / HINT
HINT:
If any work is performed on the brake system or if air in the brake lines is suspected, bleed the air from the brake system.
NOTICE:
- Move the shift lever to P and apply the parking brake before bleeding the brakes.
- Add brake fluid to keep the level between MIN and MAX lines of the reservoir while bleeding the brakes.
- If brake fluid leaks onto any painted surface, wash off and remove the brake fluid completely.
- If bleeding is performed with the engine running or the ignition switch ON, DTC C1441 will be stored. Make sure to clear the DTCs when work is complete.
PROCEDURE
1. REMOVE COWL TOP VENTILATOR LOUVER BRACKET RH
2. FILL RESERVOIR WITH BRAKE FLUID
3. BLEED BRAKE MASTER CYLINDER
NOTICE:
- If the master cylinder is reinstalled or runs out of brake fluid, bleed the master cylinder.
- To prevent brake fluid from damaging painted surfaces, cover any surrounding parts with a piece of cloth.
|
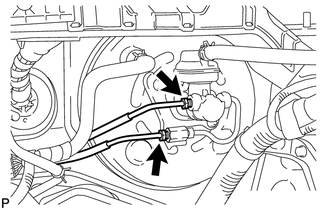
(a) Using a union nut wrench (12 mm), disconnect the 2 brake lines from the master cylinder sub-assembly. |
|
|
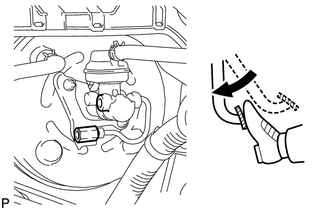
(b) Slowly depress the brake pedal and hold it*1. |
|
|
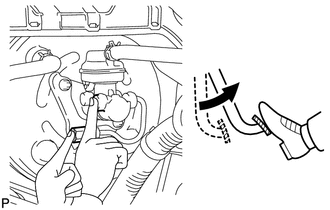
(c) Cover the 2 outer holes with fingers, and release the brake pedal*2. |
|
(d) Repeat steps *1 and *2, 3 or 4 times.
4. BLEED BRAKE LINE
NOTICE:
- Bleed the brake line of the wheel farthest from the master cylinder first.
- Add brake fluid to keep the level between the MIN and MAX lines of the reservoir while bleeding the brakes.
- If brake fluid leaks onto any painted surface, immediately wash it off.
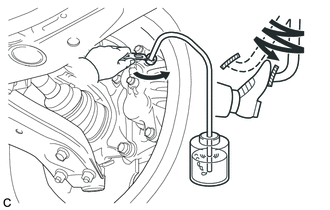
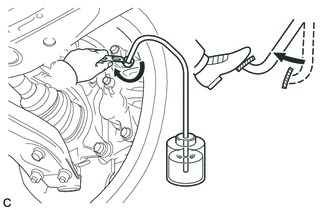
(a) Connect a vinyl tube to the bleeder plug.
|
(b) Depress the brake pedal several times, and then loosen the bleeder plug with the pedal depressed*1. |
|
|
(c) When fluid stops coming out, tighten the bleeder plug, and then release the brake pedal*2. |
|
(d) Repeat *1 and *2 until all the air in the fluid is completely bled out.
(e) Tighten the bleeder plug completely.
Torque:
Front bleeder plug :
8.3 N·m {85 kgf·cm, 73 in·lbf}
Rear bleeder plug :
11 N·m {110 kgf·cm, 8 ft·lbf}
(f) Repeat the above procedure for each wheel to bleed the brake line.
5. BLEED BRAKE ACTUATOR
NOTICE:
After bleeding the air from the brake system, if the correct height or feel of the brake pedal cannot be obtained, bleed the air from the brake actuator assembly using the Techstream by following the procedure below.
(a) Depress the brake pedal more than 20 times with the ignition switch off.
(b) Connect the Techstream to the DLC3, then turn the ignition switch to ON.
NOTICE:
Do not start the engine.
(c) Turn the Techstream on and enter the following menus: Chassis / ABS/VSC/TRAC / Utility / Air Bleeding.
(d) Bleed brake actuator following the instructions on the Techstream.
(e) After air bleeding, tighten each bleeder plug.
Torque:
Front bleeder plug :
8.3 N·m {85 kgf·cm, 73 in·lbf}
Rear bleeder plug :
11 N·m {110 kgf·cm, 8 ft·lbf}
(f) Turn the Techstream off and disconnect the Techstream from the DLC3.
(g) Turn the ignition switch off.
6. INSPECT FOR BRAKE FLUID LEAK
7. INSPECT FLUID LEVEL IN RESERVOIR
8. INSTALL COWL TOP VENTILATOR LOUVER BRACKET RH
9. CHECK AND CLEAR DTCS
|
|
|
![2016 - 2020 MY Sienna [12/2015 - ]; BRAKE SYSTEM (OTHER): BRAKE FLUID: REPLACEMENT+](/t3Portal/stylegraphics/info.gif)
