| Last Modified: 08-28-2024 | 6.11:8.1.0 | Doc ID: RM100000000VISI |
| Model Year Start: 2016 | Model: Sienna | Prod Date Range: [12/2015 - ] |
| Title: FRONT SUSPENSION: FRONT SHOCK ABSORBER: INSTALLATION; 2016 - 2020 MY Sienna [12/2015 - ] | ||
INSTALLATION
CAUTION / NOTICE / HINT
HINT:
- Use the same procedure for the LH side and RH side.
- The following procedure listed below is for the LH side.
PROCEDURE
1. INSTALL FRONT COIL SPRING LOWER INSULATOR
|
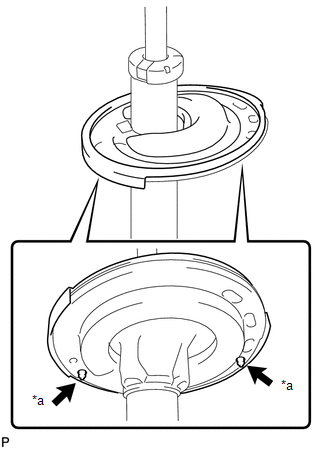
(a) Install the front coil spring lower insulator to the front shock absorber assembly. Text in Illustration
NOTICE: Make sure that the positioning pins on the front coil spring lower insulator are inserted into the holes in the front shock absorber assembly. |
|
2. INSTALL FRONT SPRING BUMPER
|
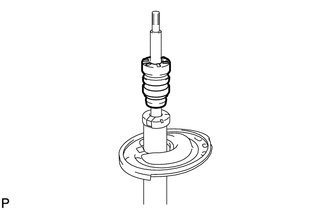
(a) Install the front spring bumper to the front shock absorber assembly. |
|
3. INSTALL FRONT COIL SPRING
|
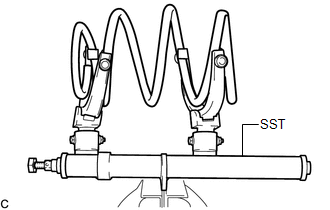
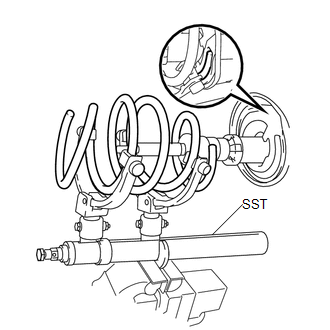
(a) Install SST to the front coil spring, and secure SST in a vise. SST: 09727-00050 SST: 09727-30021 09727-00010 09727-00031 |
|
|
(b) Attach the arm of SST to the diameter of the front coil spring. Text in Illustration
CAUTION:
|
|
(c) Using SST, compress the front coil spring.
CAUTION:
- If the front coil spring bends during the compression, immediately stop the compression and reinstall SST.
- Do not compress the spring until the coil springs contact each other.
- Do not use an impact wrench. It will damage SST.
|
(d) Install the front coil spring to the front shock absorber assembly. NOTICE: Make sure that the end of the front coil spring is positioned in the depression of the lower spring seat. |
|
4. INSTALL FRONT COIL SPRING UPPER INSULATOR
|
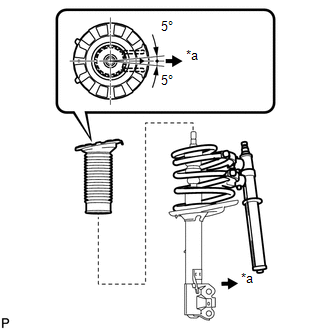
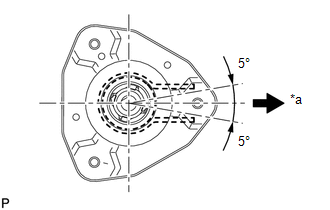
(a) Install the front coil spring upper insulator as shown in the illustration. Text in Illustration
HINT: Any misalignment between the front shock absorber lower bracket and alignment mark must be +/- 5°. |
|
5. INSTALL FRONT COIL SPRING UPPER SEAT
|
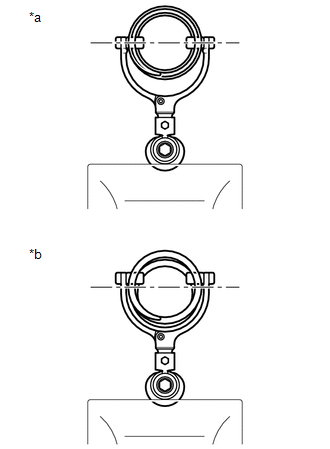
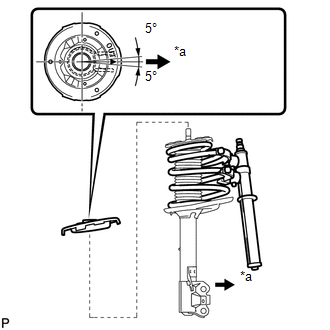
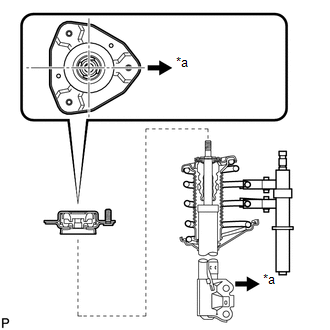
(a) Install the front coil spring upper seat with the mark facing to the outside of the vehicle. Text in Illustration
HINT: Any misalignment between the front shock absorber lower bracket and alignment mark must be +/- 5°. |
|
6. INSTALL FRONT SUSPENSION SUPPORT BEARING
|
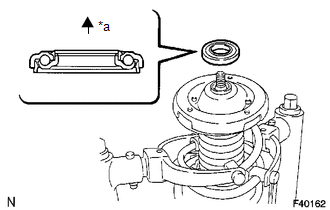
(a) Install the front suspension support bearing as shown in the illustration. Text in Illustration
HINT: If there is foreign matter inside the front suspension support bearing, replace it with a new one. |
|
7. INSTALL FRONT SUSPENSION SUPPORT SUB-ASSEMBLY
|
(a) Install the front suspension support sub-assembly as shown in the illustration. Text in Illustration
HINT: Check that the slots on the piston rod and front suspension support sub-assembly are aligned. |
|
(b) Temporarily tighten a new front suspension support nut.
|
(c) While aligning the stud bolt of the front suspension support sub-assembly and front shock absorber lower bracket, remove SST from the front coil spring. Text in Illustration
NOTICE:
|
|
8. INSTALL FRONT SHOCK ABSORBER WITH COIL SPRING
(a) Install the front shock absorber with coil spring (upper side) with the nut.
Torque:
90 N·m {918 kgf·cm, 66 ft·lbf}
(b) Install the 2 spacers to the front shock absorber with coil spring (upper side).
(c) Install the front shock absorber with coil spring (lower side) to the steering knuckle with the 2 bolts and 2 nuts.
Torque:
290 N·m {2957 kgf·cm, 214 ft·lbf}
NOTICE:
When installing the nuts, keep the bolts from rotating.
9. INSTALL FRONT STABILIZER LINK ASSEMBLY
(a) Install the front stabilizer link assembly to the front shock absorber assembly with the nut.
Torque:
130 N·m {1326 kgf·cm, 96 ft·lbf}
HINT:
If the ball joint turns together with the nut, use a hexagon wrench 6 mm to hold the stud bolt.
10. INSTALL FRONT SPEED SENSOR
(a) Install the front speed sensor and front flexible hose with the bolt.
Torque:
19 N·m {192 kgf·cm, 14 ft·lbf}
NOTICE:
Do not twist the front speed sensor when installing it.
(b) Install the resin clamp.
11. INSTALL COWL PANEL SUB-ASSEMBLY
(a) Install the cowl panel sub-assembly with the 5 bolts and 4 nuts.
Torque:
Bolt :
5.5 N·m {56 kgf·cm, 49 in·lbf}
Nut :
90 N·m {918 kgf·cm, 66 ft·lbf}
(b) Engage the 5 clamps and install the engine room main wire.
(c) w/ Windshield Deicer System:
(1) Connect the connector and engage the clamp.
(d) Connect the fuel pump resistor connector.
12. FULLY TIGHTEN FRONT SUSPENSION SUPPORT NUT
(a) Fully tighten the front suspension support nut.
Torque:
70 N·m {714 kgf·cm, 52 ft·lbf}
13. INSTALL WINDSHIELD WIPER MOTOR AND LINK ASSEMBLY
![2016 - 2020 MY Sienna [12/2015 - ]; WIPER / WASHER: FRONT WIPER MOTOR: INSTALLATION+](/t3Portal/stylegraphics/info.gif)
14. INSTALL COWL TOP VENTILATOR LOUVER SUB-ASSEMBLY
15. INSTALL FRONT FENDER TO COWL SIDE SEAL LH
16. INSTALL FRONT FENDER TO COWL SIDE SEAL RH
17. INSTALL FRONT WIPER ARM AND BLADE ASSEMBLY LH
18. INSTALL FRONT WIPER ARM AND BLADE ASSEMBLY RH
19. INSTALL FRONT WIPER ARM HEAD CAP
20. INSTALL FRONT WHEEL
Torque:
103 N·m {1050 kgf·cm, 76 ft·lbf}
21. INSPECT AND ADJUST FRONT WHEEL ALIGNMENT
(See page
)
|
|
|