| Last Modified: 08-28-2024 | 6.11:8.1.0 | Doc ID: RM100000000VIR7 |
| Model Year Start: 2016 | Model: Sienna | Prod Date Range: [12/2015 - 08/2016] |
| Title: DRIVE SHAFT / PROPELLER SHAFT: FRONT DRIVE SHAFT ASSEMBLY: REMOVAL; 2016 MY Sienna [12/2015 - 08/2016] | ||
REMOVAL
PROCEDURE
1. PRECAUTION (for AWD)
Refer to drive shaft system precaution (See page
![2016 - 2020 MY Sienna [12/2015 - ]; DRIVE SHAFT / PROPELLER SHAFT: DRIVE SHAFT SYSTEM: PRECAUTION](/t3Portal/stylegraphics/info.gif) ).
).
2. DRAIN AUTOMATIC TRANSAXLE FLUID (for 2WD)
3. DRAIN AUTOMATIC TRANSAXLE FLUID (for AWD)
4. DRAIN TRANSFER OIL (for AWD)
5. REMOVE FRONT WHEELS
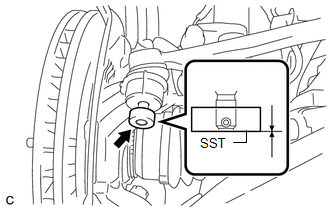
6. REMOVE FRONT AXLE SHAFT NUT
|
(a) Using SST and a hammer, release the staked part of the front axle shaft nut. SST: 09930-00010 NOTICE: Loosen the staked part of the nut completely, otherwise the threads of the drive shaft may be damaged. |
|
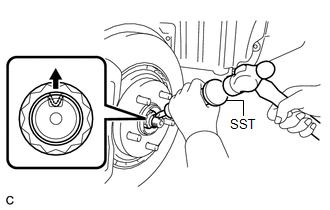
(b) While applying the brakes, remove the front axle shaft nut.
7. SEPARATE FRONT STABILIZER LINK ASSEMBLY
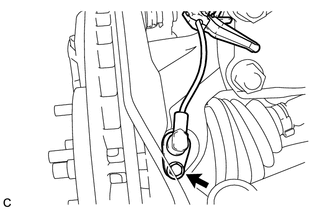
8. SEPARATE FRONT SPEED SENSOR
|
(a) Remove the bolt and separate the front speed sensor from the steering knuckle. |
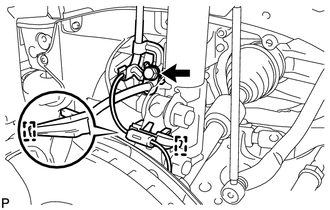
|
|
(b) Remove the bolt and 2 clamps, and separate the front speed sensor and front flexible hose. |
|
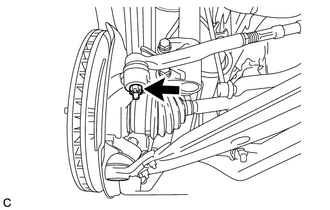
9. SEPARATE TIE ROD ASSEMBLY
|
(a) Remove the cotter pin and nut. |
|
|
(b) Install SST to the tie rod end. SST: 09960-20010 09961-02060 NOTICE: Make sure that the lower ends of the tie rod end and SST are aligned. |
|
(c) Using SST, separate the tie rod end from the steering knuckle.
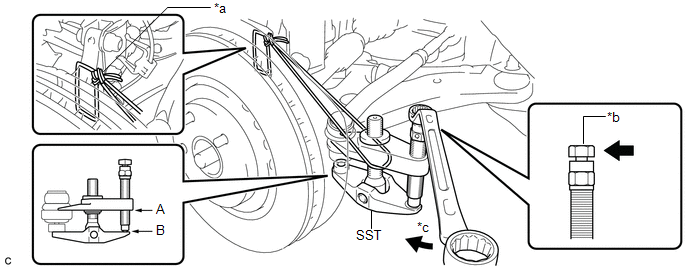
Text in Illustration
|
*a |
Tie the string without allowing for any slack. |
*b |
Place the wrench here. |
|
*c |
Turn |
- |
- |
SST: 09960-20010
NOTICE:
- Apply grease to the threads and end of the SST bolt.
- When securing SST to the steering knuckle, be sure to tighten SST using a string to prevent it from falling.
- Install SST so that A and B are parallel.
- Be sure to place a wrench on the part indicated in the illustration.
- Do not damage the front disc brake dust cover.
- Do not damage the ball joint dust cover.
- Do not damage the steering knuckle.
10. SEPARATE FRONT LOWER SUSPENSION ARM
11. SEPARATE FRONT AXLE ASSEMBLY
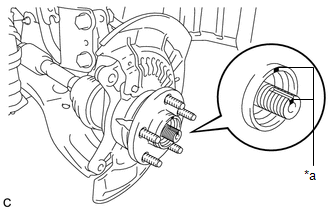
|
(a) Put matchmarks on the front drive shaft assembly and front axle hub sub-assembly.
|
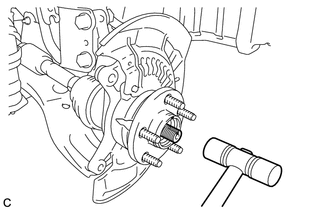
|
|
(b) Using a plastic hammer, tap the end of the drive shaft and disengage the fitting between the drive shaft and front axle. HINT: If it is difficult to disengage the fitting, tap the end of the drive shaft with a brass bar and hammer. |
|
(c) Pull the front axle out of the vehicle to remove the drive shaft from the front axle.
NOTICE:
- Do not pull the front axle further out of the vehicle than is necessary.
- Do not damage the outboard joint boot.
- Do not damage the speed sensor rotor.
- Suspend the drive shaft with a piece of string or the equivalent.
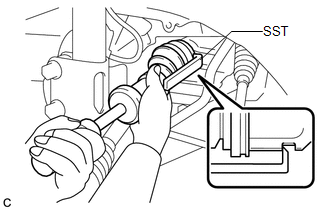
12. REMOVE FRONT DRIVE SHAFT ASSEMBLY LH
|
(a) Using SST, remove the front drive shaft assembly LH. SST: 09520-01010 SST: 09520-24010 09520-32040 NOTICE:
|
|
13. REMOVE FRONT FENDER APRON SEAL RH (for AWD)
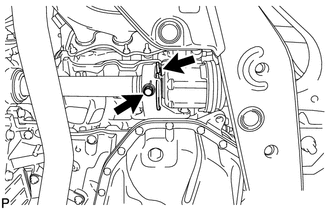
14. REMOVE ENGINE MOUNTING BRACKET RH (for AWD)
(a) Support the engine assembly with a transmission jack.
|
(b) Remove the nut. |
|
|
(c) Remove the 3 bolts and remove the engine mounting bracket RH from the engine assembly. |
|

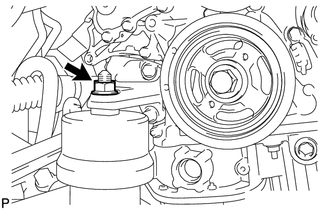
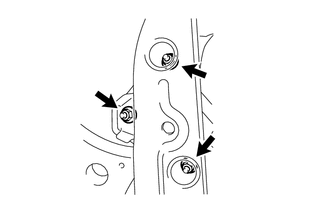
15. REMOVE ENGINE MOUNTING INSULATOR RH (for AWD)
(a) Remove the 2 hole plugs.
|
(b) Remove the 3 nuts and remove the engine mounting insulator RH. |
|
16. REMOVE FRONT DRIVE SHAFT ASSEMBLY RH
|
(a) Remove the bearing bracket hole snap ring from the drive shaft bearing bracket. |
|
(b) Remove the bolt and front drive shaft assembly RH from the drive shaft bearing bracket.
NOTICE:
- Be careful not to damage the inboard joint boot or oil seal.
- Be careful not to drop the drive shaft assembly.
|
|
|