| Last Modified: 08-28-2024 | 6.11:8.1.0 | Doc ID: RM100000000VIOG |
| Model Year Start: 2016 | Model: Sienna | Prod Date Range: [12/2015 - 08/2016] |
| Title: U660F (AUTOMATIC TRANSMISSION / TRANSAXLE): VALVE BODY ASSEMBLY(When Not Using the Engine Support Bridge): INSTALLATION; 2016 MY Sienna [12/2015 - 08/2016] | ||
INSTALLATION
PROCEDURE
1. INSTALL MANUAL VALVE
(a) Coat the manual valve with ATF and install it into the transmission valve body.
2. INSTALL TRANSAXLE CASE GASKET
(a) Coat 2 new transaxle case gaskets with ATF.
(b) Install the 2 transaxle case gaskets onto the transaxle case.
3. INSTALL TRANSMISSION VALVE BODY ASSEMBLY
(a) Coat the O-ring of the transmission wire with ATF.
|
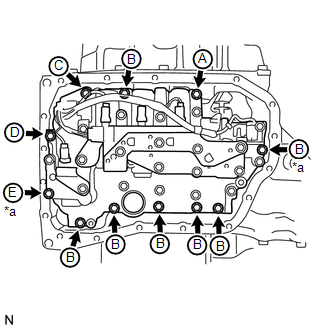
(b) Confirm that the manual valve lever is positioned as shown in the illustration and install the transmission valve body onto the automatic transaxle with the 11 bolts. Text in Illustration
Torque: 11 N·m {110 kgf·cm, 8 ft·lbf} Bolt Length
NOTICE:
|
|
4. INSTALL VALVE BODY OIL STRAINER ASSEMBLY
(a) Coat a new O-ring with ATF and install it onto the valve body oil strainer.
|
(b) Install the valve body oil strainer onto the transmission valve body with the 2 bolts. Torque: 11 N·m {110 kgf·cm, 8 ft·lbf} |
|

5. INSTALL TRANSMISSION OIL CLEANER MAGNET
|
(a) Install the 2 transmission oil cleaner magnets onto the automatic transaxle oil pan as shown in the illustration. Text in Illustration
|
|

6. INSTALL AUTOMATIC TRANSAXLE OIL PAN GASKET
(a) Install a new automatic transaxle oil pan gasket onto the automatic transaxle oil pan.
7. INSTALL AUTOMATIC TRANSAXLE OIL PAN SUB-ASSEMBLY
|
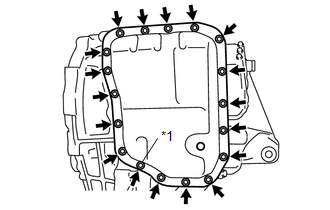
(a) Clean and degrease the bolt (*1) and the installation hole in the automatic transaxle. Text in Illustration
|
|
(b) Apply adhesive to 2 or 3 threads on the ends of the bolt (*1).
Adhesive:
Toyota Genuine Adhesive 1344, Three Bond 1344 or equivalent
(c) Install the automatic transaxle oil pan with the transaxle oil pan gasket onto the automatic transaxle with the 18 bolts.
Torque:
Precoated Bolt (*1) :
7.0 N·m {71 kgf·cm, 62 in·lbf}
except Precoated bolt :
7.5 N·m {76 kgf·cm, 66 in·lbf}
NOTICE:
- In order to ensure proper sealing of the bolt, apply adhesive to the bolt and install them within 10 minutes of adhesive application.
- Completely remove any oil or grease from the contact surface of the automatic transaxle and automatic transaxle oil pan with the automatic transaxle oil pan gasket before installation.
8. INSTALL TORQUE CONVERTER CLUTCH ASSEMBLY
![2016 MY Sienna [12/2015 - 08/2016]; U660E (AUTOMATIC TRANSMISSION / TRANSAXLE): AUTOMATIC TRANSAXLE ASSEMBLY(When Not Using the Engine Support Bridge): INSTALLATION+](/t3Portal/stylegraphics/info.gif)
9. INSTALL AUTOMATIC TRANSAXLE ASSEMBLY
(See page
)
|
|
|