| Last Modified: 04-05-2023 | 6.11:8.1.0 | Doc ID: RM100000000VING |
| Model Year Start: 2016 | Model: Sienna | Prod Date Range: [12/2015 - 08/2016] |
| Title: U660F (AUTOMATIC TRANSMISSION / TRANSAXLE): AUTOMATIC TRANSAXLE SYSTEM: REGISTRATION; 2016 MY Sienna [12/2015 - 08/2016] | ||
REGISTRATION
CAUTION / NOTICE / HINT
NOTICE:
- When the automatic transaxle is replaced, the transaxle compensation code must be input into the TCM (proceed to Procedure 1). After the automatic transaxle is reinstalled, the Quick Response (QR) code label will be positioned where the code cannot be read. Therefore, before reinstalling the automatic transaxle, record the transaxle compensation codes or input them in the Techstream.
- When the TCM is replaced, the existing transaxle compensation codes must be input into the new TCM (proceed to Procedure 2).
PROCEDURE
1. INPUT TRANSAXLE COMPENSATION CODE INTO TCM (Procedure 1)
NOTICE:
Transaxle compensation codes are unique, 60-digit alphanumeric values printed on a QR label on the transaxle. If an incorrect transaxle compensation code is input into the TCM, shift shock may occur.
|
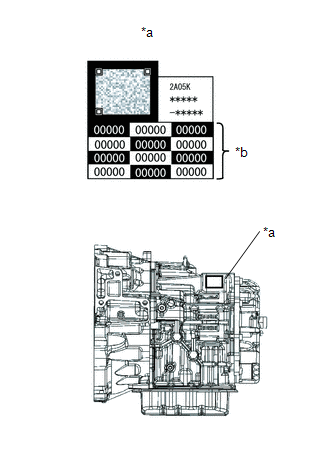
(a) Record the transaxle compensation code specified on the QR label. Text in Illustration
HINT: The transaxle compensation code is imprinted on the QR label. |
|
(b) Move the shift lever to N or P.
(c) Connect the Techstream to the DLC3.
(d) Turn the ignition switch to ON.
(e) Turn the Techstream on.
NOTICE:
Do not start the engine.
(f) Enter the following menus: Powertrain / ECT / Utility / A/T Code Registration.
(g) Select "Set Compensation Code".
(h) Register the compensation code.
(1) Press "Input".
(2) Manually input the transaxle compensation code. The code is a 60-digit alphanumeric value printed on the QR label. After inputting the code, press "OK".
(i) Check that the compensation code displayed on the screen is correct by comparing it with the 60-digit alphanumeric value on the QR label.
NOTICE:
If an incorrect transaxle compensation code is input into the TCM, shift shock will occur.
(j) Press "NEXT" to set the compensation code to the TCM.
HINT:
- If the registration process fails, the compensation code may be incorrect. Check the compensation code again.
- If the attempted compensation code is correct, a problem with the wire harness or a bad connection with the DLC3 may cause a registration failure. Check the wire harness and the DLC3 connection. If no problem is found, the TCM may be malfunctioning. Check the TCM and repeat this operation.
(k) Press "EXIT".
2. TRANSFER TRANSAXLE COMPENSATION CODE (Procedure 2)
NOTICE:
Transaxle compensation codes are 60-digit alphanumeric values imprinted on a QR label on the transaxle. If an incorrect transaxle compensation code is input into the TCM, shift shock may occur.
HINT:
The following operation is available for use with TCMs that can transmit the registered transaxle compensation code to the Techstream.
(a) Move the shift lever to N or P.
(b) Connect the Techstream to the DLC3.
(c) Turn the ignition switch to ON.
(d) Turn the Techstream on.
NOTICE:
Do not start the engine.
HINT:
The transaxle compensation code is imprinted on the QR label.
(e) Read the transaxle compensation code.
(1) Enter the following menus: Powertrain / ECT / Utility / A/T Code Registration.
(2) Select "Read Compensation Code".
(3) Press "Save".
(4) Press "Save" or "Overwrite".
HINT:
Press "Overwrite".
NOTICE:
Do not use the code specified on the transaxle QR label even if the transaxle compensation code cannot be read using the Techstream. The code printed on an in-service transaxle may not match its current characteristics. Replace the TCM with a new one and perform a road test to allow the TCM to learn.
(5) Press "EXIT".
(6) Turn the ignition switch off.
(f) Replace the TCM.
(g) Set the transaxle compensation code.
(1) Turn the ignition switch to ON.
(2) Turn the Techstream on.
(3) Enter the following menus: Powertrain / ECT / Utility / A/T Code Registration.
(4) Select "Set Compensation Code".
(5) Press "Open".
(6) Press "Open" again to proceed.
(7) Press "Exit".
|
|
|