| Last Modified: 08-28-2024 | 6.11:8.1.0 | Doc ID: RM100000000VIG9 |
| Model Year Start: 2016 | Model: Sienna | Prod Date Range: [12/2015 - 08/2016] |
| Title: 2GR-FE LUBRICATION: OIL PUMP: INSTALLATION; 2016 MY Sienna [12/2015 - 08/2016] | ||
INSTALLATION
PROCEDURE
1. INSTALL TIMING GEAR CASE OR TIMING CHAIN CASE OIL SEAL
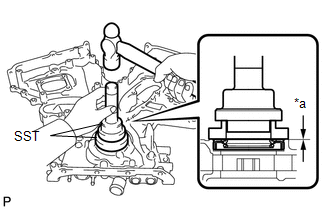
(a) Apply MP grease to a new timing chain case oil seal lip.
|
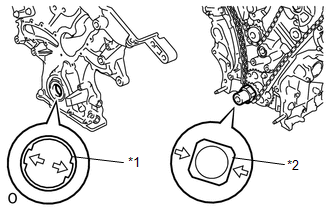
(b) Using SST, tap in a new oil seal until its surface is flush with the timing chain cover edge. SST: 09223-22010 SST: 09506-35010 Oil seal tap in depth: 0 to 1.0 mm (0 to 0.0393 in.) Text in Illustration
NOTICE:
|
|
2. INSTALL TIMING CHAIN COVER SUB-ASSEMBLY
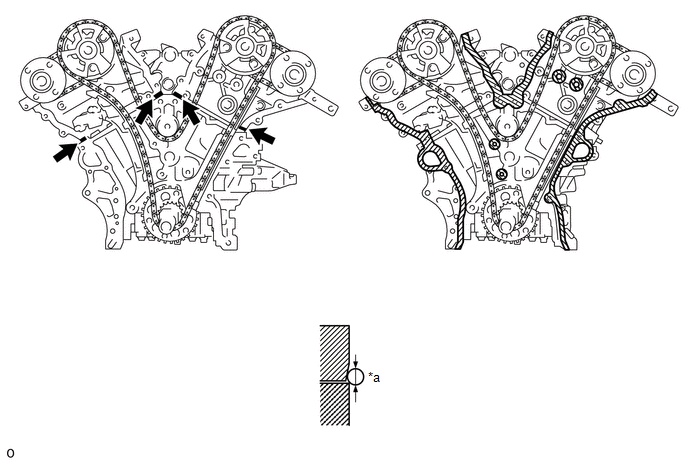
(a) Apply seal packing in a continuous line to the engine unit as shown in the following illustration.
Text in Illustration
|
*a |
Seal Packing Diameter: 3.0 mm or more |

|
Seal Packing |

|
Be sure to clean and degrease the contact surfaces |
- |
- |
Seal packing:
Toyota Genuine Seal Packing Black, Three Bond 1207B or equivalent
Seal diameter:
3.0 mm (0.118 in.) or more
NOTICE:
- Be sure to clean and degrease the contact surfaces.
- If there is oil on the contact surfaces, wipe them with an oil-free cloth before applying seal packing.
- Install the timing chain cover sub-assembly within 3 minutes after applying seal packing.
- Do not start the engine for at least 2 hours after installing the timing chain cover sub-assembly.
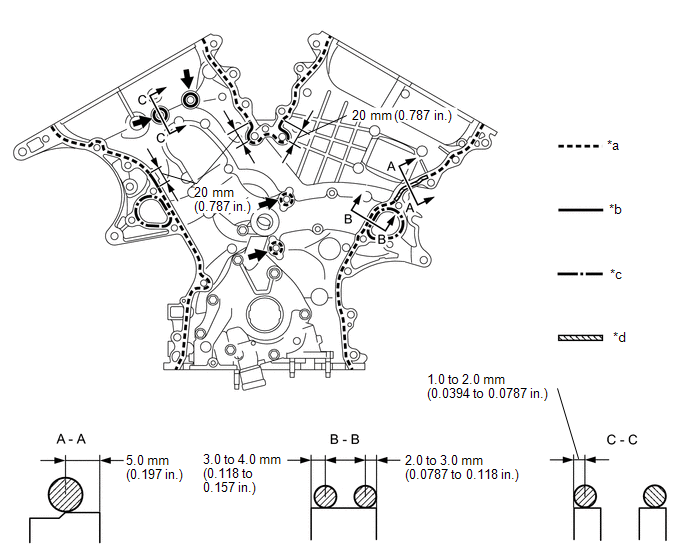
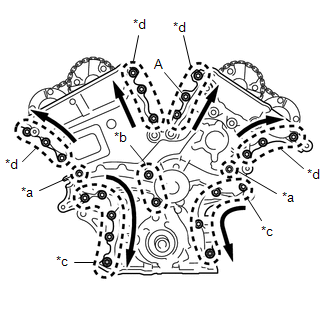
(b) Apply seal packing in a line to the timing chain cover as shown in the following illustration.
Text in Illustration
|
*a |
Dashed line area: (Seal Packing: Toyota Genuine Seal Packing Black, Three Bond 1207B or equivalent) |
*b |
Continuous line area: (Seal Packing: Toyota Genuine Seal Packing Black, Three Bond 1207B or equivalent) |
|
*c |
Alternate long and short dashed line area: (Seal Packing: Toyota Genuine Seal Packing 1282B, Three Bond 1282B or equivalent) |
*d |
Diagonal line area: (Seal Packing: Toyota Genuine Seal Packing Black, Three Bond 1207B or equivalent) |
|
|
Be sure to apply seal packing |
- |
- |
Seal packing:
Toyota Genuine Seal Packing Black, Three Bond 1207B or equivalent
Toyota Genuine Seal Packing 1282B, Three Bond 1282B or equivalent
NOTICE:
- If there is oil on the contact surfaces, wipe them with an oil-free cloth before applying seal packing.
- Install the timing chain cover sub-assembly within 3 minutes and tighten the bolts within 15 minutes after applying seal packing.
- Do not start the engine for at least 2 hours after installing the timing chain cover sub-assembly.
Seal Packing Application Chart:
|
Area |
Seal Packing Diameter |
Application Position from Inside Seal Line |
|---|---|---|
|
Continuous Line Area |
4.5 mm (0.177 in.) or more |
1.0 to 2.0 mm (0.0394 to 0.0787 in.) |
|
Alternate Long and Short Dashed Line Area |
3.5 mm (0.138 in.) or more |
2.0 to 3.0 mm (0.0787 to 0.118 in.) |
|
Dashed Line Area |
3.5 mm (0.138 in.) or more |
3.0 to 4.0 mm (0.118 to 0.158 in.) |
|
Diagonal Line Area |
6.0 mm (0.236 in.) or more |
5.0 mm (0.197 in.) |
|
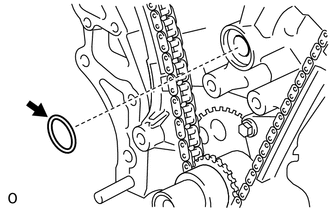
(c) Install a new gasket. |
|
|
(d) Align the oil pump's drive rotor spline and the crankshaft as shown in the illustration. Install the oil pump and timing chain cover to the crankshaft. Text in Illustration
|
|
|
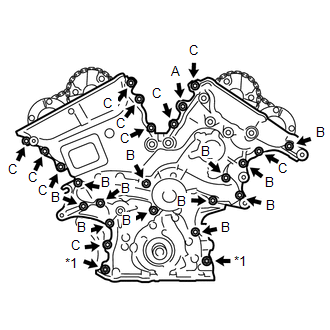
(e) Temporarily tighten the timing chain cover with the 23 bolts and 2 nuts. Text in Illustration
Bolt Length
NOTICE: Make sure that there is no oil on the threads of bolt B and C. |
|
|
(f) Fully tighten the bolts in area 1 and area 2. Text in Illustration
Torque: 21 N·m {214 kgf·cm, 15 ft·lbf} |
|
(g) Fully tighten the bolts and nuts in area 3.
Torque:
21 N·m {214 kgf·cm, 15 ft·lbf}
HINT:
Tighten the bolts and nuts from top to bottom as shown in the illustration.
(h) Fully tighten the bolts in area 4.
Torque:
Bolt A :
43 N·m {438 kgf·cm, 32 ft·lbf}
Except bolt A :
21 N·m {214 kgf·cm, 15 ft·lbf}
HINT:
Tighten the bolts from bottom to top as shown in the illustration.
3. INSTALL OIL PAN SUB-ASSEMBLY
![2016 MY Sienna [12/2015 - 08/2016]; 2GR-FE ENGINE MECHANICAL: ENGINE UNIT: REASSEMBLY+](/t3Portal/stylegraphics/info.gif)
4. INSTALL OIL STRAINER SUB-ASSEMBLY
5. INSTALL NO. 2 OIL PAN SUB-ASSEMBLY
6. INSTALL CYLINDER HEAD COVER SUB-ASSEMBLY (for Bank 2)
7. INSTALL CYLINDER HEAD COVER SUB-ASSEMBLY (for Bank 1)
8. INSTALL WATER INLET HOUSING
9. INSTALL OIL COOLER PIPE (w/ oil cooler)
(a) Install a new gasket to the oil pan sub-assembly.
(b) Install the oil cooler pipe with the bolt and 2 nuts.
Torque:
21 N·m {214 kgf·cm, 15 ft·lbf}
10. INSTALL CRANKSHAFT PULLEY
11. INSTALL OIL PIPE
12. INSTALL NO. 1 OIL PIPE
13. INSTALL CRANKSHAFT POSITION SENSOR
14. INSTALL IGNITION COIL ASSEMBLY
15. INSTALL ENGINE ASSEMBLY
(See page
)
|
|
|