| Last Modified: 08-28-2024 | 6.11:8.1.0 | Doc ID: RM100000000VIFX |
| Model Year Start: 2016 | Model: Sienna | Prod Date Range: [12/2015 - 08/2016] |
| Title: 2GR-FE COOLING: RADIATOR: INSTALLATION; 2016 MY Sienna [12/2015 - 08/2016] | ||
INSTALLATION
PROCEDURE
1. INSTALL NO. 2 RADIATOR ASSEMBLY
(a) Install the radiator drain cock plug to the radiator assembly.
NOTICE:
Replace the O-ring if it is damaged.
(b) Install the fan assembly with motor to the radiator with the 3 guides at the bottom and engage the claw.
(c) Install the 2 bolts.
Torque:
7.1 N·m {72 kgf·cm, 63 in·lbf}
(d) Connect the radiator reservoir tank hose.
(e) Install the 2 radiator support cushions and the 2 lower radiator supports to the radiator.
|
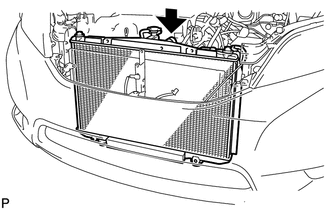
(f) Install the radiator assembly and fan assembly with motor onto the vehicle. NOTICE: Do not apply any excessive force to the cooler condenser assembly or pipe when installing the radiator assembly. |
|
(g) Connect the 3 wire harness clamps and connector.
(h) Install the radiator assembly with the 4 bolts and 4 cooler brackets.
Torque:
6.0 N·m {61 kgf·cm, 53 in·lbf}
2. INSTALL UPPER RADIATOR SUPPORT SUB-ASSEMBLY
(a) Install the upper radiator support with the 5 bolts.
Torque:
6.0 N·m {61 kgf·cm, 53 in·lbf}
(b) Connect the 2 horn connectors.
(c) Connect the clamp of the hood lock control cable.
3. INSTALL HOOD LOCK ASSEMBLY
4. INSPECT HOOD LOCK ASSEMBLY
5. ADJUST HOOD LOCK ASSEMBLY
6. INSTALL HOOD LOCK NUT CAP
7. INSTALL MILLIMETER WAVE RADAR SENSOR (w/ Dynamic Radar Cruise Control System)
8. ADJUST MILLIMETER WAVE RADAR SENSOR (w/ Dynamic Radar Cruise Control System)
9. CONNECT OUTLET OIL COOLER HOSE
|
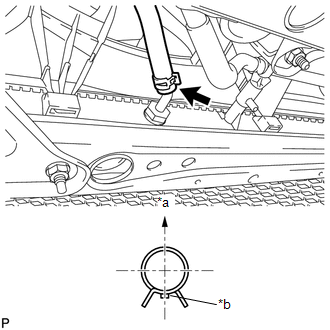
(a) Connect the outlet oil cooler hose to the radiator with the hose clamp. Text in Illustration
HINT: Perform the installation with the hose clamp and mark at the correct angle. |
|
10. CONNECT INLET OIL COOLER HOSE
|
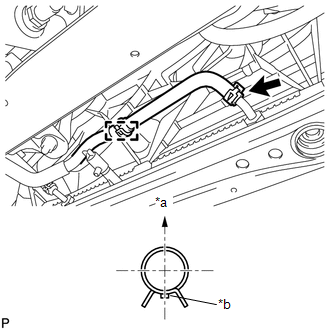
(a) Connect the clamp and inlet oil cooler hose to the radiator with the hose clamp. Text in Illustration
HINT: Perform the installation with the hose clamp and mark at the correct angle. |
|
11. CONNECT NO. 2 RADIATOR HOSE
|
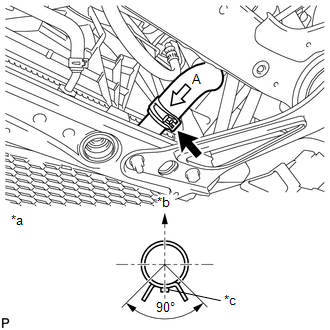
(a) Connect the No. 2 radiator hose to the radiator with the hose clamp. Text in Illustration
HINT: Perform the installation with the hose clamp and mark at the correct angle. |
|
12. CONNECT NO. 1 RADIATOR HOSE
|
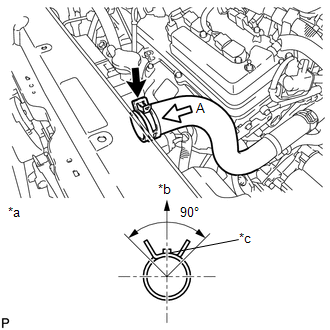
(a) Connect the No. 1 radiator hose to the radiator with the hose clamp. Text in Illustration
HINT: Perform the installation with the hose clamp and mark at the correct angle. |
|
13. INSTALL RADIATOR GRILLE SUB-ASSEMBLY
14. INSTALL AIR CLEANER INLET COVER ASSEMBLY SEAL
15. ADD ENGINE COOLANT
16. INSPECT FOR COOLANT LEAK
17. ADD AUTOMATIC TRANSAXLE FLUID (for 2WD)
18. ADD AUTOMATIC TRANSAXLE FLUID (for AWD)
19. INSPECT FOR OIL LEAK
20. INSTALL NO. 1 ENGINE UNDER COVER
21. WARM UP ENGINE
|
|
|
![2016 - 2017 MY Sienna [12/2015 - 11/2017]; DOOR / HATCH: HOOD LOCK CONTROL CABLE ASSEMBLY: INSTALLATION+](/t3Portal/stylegraphics/info.gif)
