| Last Modified: 08-28-2024 | 6.11:8.1.0 | Doc ID: RM100000000VIFM |
| Model Year Start: 2016 | Model: Sienna | Prod Date Range: [12/2015 - 08/2016] |
| Title: 2GR-FE COOLING: WATER PUMP: REMOVAL; 2016 MY Sienna [12/2015 - 08/2016] | ||
REMOVAL
PROCEDURE
1. DISCONNECT CABLE FROM NEGATIVE BATTERY TERMINAL
NOTICE:
When disconnecting the cable, some systems need to be initialized after the cable is reconnected.
Click here
![2016 MY Sienna [12/2015 - 08/2016]; INTRODUCTION: REPAIR INSTRUCTION: INITIALIZATION](/t3Portal/stylegraphics/info.gif)
2. REMOVE V-BANK COVER SUB-ASSEMBLY
Click here
3. REMOVE NO. 1 ENGINE UNDER COVER
Click here
4. REMOVE NO. 2 ENGINE UNDER COVER (for AWD)
Click here
5. DRAIN ENGINE COOLANT
Click here
6. REMOVE FAN AND GENERATOR V BELT
Click here
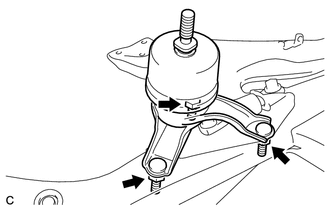
7. SEPARATE FRONT ENGINE MOUNTING INSULATOR ASSEMBLY
(a) Remove the hole plugs.
|
(b) Remove the 3 nuts. |
|
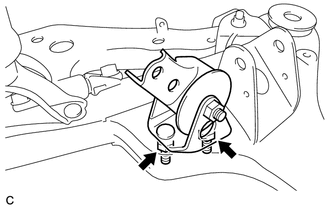
8. SEPARATE ENGINE MOUNTING INSULATOR RH
(a) Remove the hole plugs.
|
(b) Remove the 3 nuts. |
|
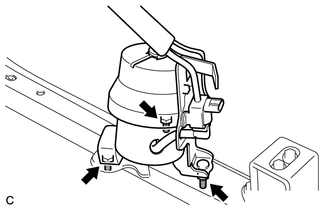
9. SEPARATE REAR ENGINE MOUNTING INSULATOR ASSEMBLY
(a) Remove the hole plugs.
|
(b) Remove the 2 nuts. |
|
10. REMOVE NO. 2 ENGINE MOUNTING STAY RH
Click here
11. REMOVE ENGINE MOVING CONTROL ROD BRACKET
Click here
12. REMOVE ENGINE MOVING CONTROL ROD
Click here
13. REMOVE NO. 2 ENGINE MOUNTING STAY RH
Click here
14. DISCONNECT NO. 2 RADIATOR HOSE
Click here
15. REMOVE NO. 1 FRONT ENGINE MOUNTING BRACKET LH
|
(a) Remove the 4 bolts. |
|
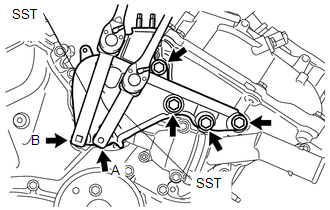
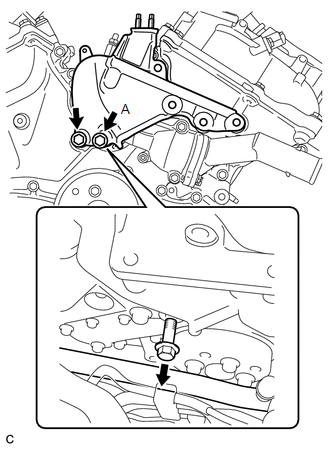
(b) Using SST, loosen the bolt (A).
SST: 09249-37010
(c) Using SST, loosen the bolt (B).
SST: 09961-00950
(d) Place a wooden block between a jack and the engine.
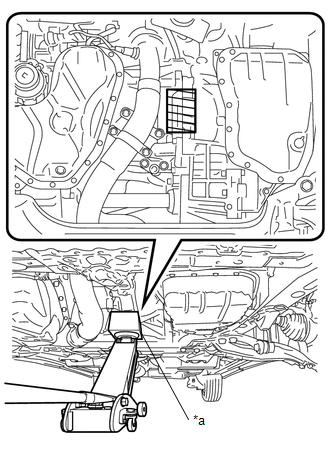
|
*a |
Wooden Block |

|
Placement Position |
NOTICE:
Make sure to set a jack as shown in the illustration. Do not place the jack on the oil pan.
(e) Jack up the engine slightly, and support the specified location with a safety stand.
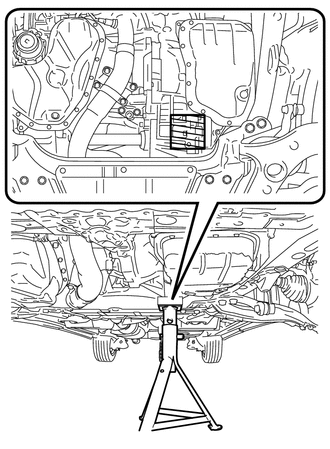
|
|
Placement Position |
NOTICE:
Do not jack up the engine excessively.
|
(f) Remove the 2 bolts and No. 1 front engine mounting bracket LH. HINT: Lift the engine so that bolt A passes above the No. 1 cooler refrigerant suction pipe. |
|
(g) Lower the engine.
NOTICE:
When lowering the jack, align the stud bolts of the engine mounting insulators with the bolt holes of the front frame assembly.
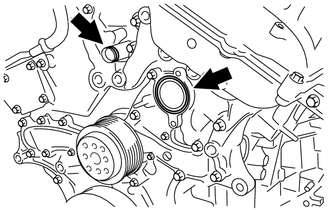
16. REMOVE WATER INLET HOUSING
|
(a) Disconnect the water hose. |
|
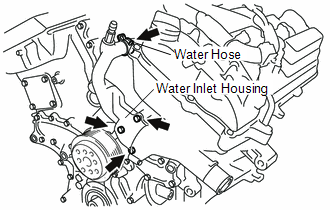
(b) Remove the 2 bolts, nut and water inlet housing.
|
(c) Remove the water inlet housing gasket and water outlet pipe O-ring. |
|
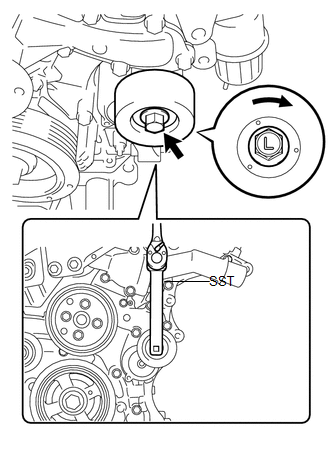
17. REMOVE V-RIBBED BELT TENSIONER PULLEY
(a) Remove the 5 mm bi-hexagon wrench.
|
(b) Using SST, remove the bolt, dust shield and V-ribbed belt tensioner pulley. SST: 09961-00950 NOTICE:
|
|
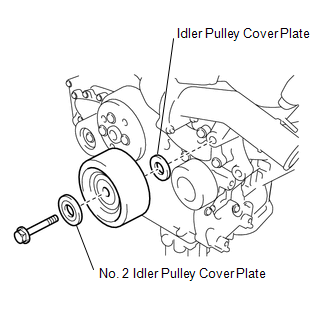
18. REMOVE NO. 2 IDLER PULLEY SUB-ASSEMBLY
|
(a) Remove the bolt, No. 2 idler pulley cover plate, No. 2 idler pulley sub-assembly and idler pulley cover plate. HINT: Plate diameter: Idler pulley cover plate: 33.6 mm (1.32 in.) No. 2 idler pulley cover plate: 37.8 mm (1.49 in.) |
|
19. SEPARATE WATER PUMP PULLEY
|
(a) Using SST, hold the water pump pulley. SST: 09960-10010 09962-01000 09963-00700 |
|
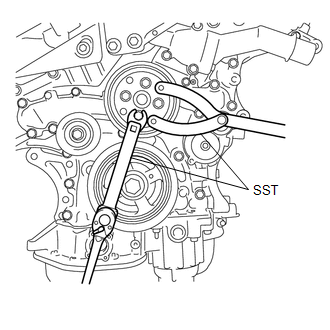
(b) Using SST and a union nut wrench, remove the 4 bolts and separate the water pump pulley from the water pump assembly.
SST: 09961-00950
HINT:
There is not enough clearance to completely remove the water pump pulley from the water pump shaft. Remove the water pump pulley together with the water pump assembly.
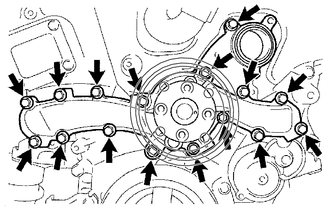
20. REMOVE WATER PUMP ASSEMBLY
|
(a) Remove the 16 bolts, water pump assembly, water pump pulley and water pump gasket. |
|
|
|
|