| Last Modified: 08-28-2024 | 6.11:8.1.0 | Doc ID: RM100000000VIF4 |
| Model Year Start: 2016 | Model: Sienna | Prod Date Range: [12/2015 - 08/2016] |
| Title: 2GR-FE INTAKE / EXHAUST: INTAKE MANIFOLD: INSTALLATION; 2016 MY Sienna [12/2015 - 08/2016] | ||
INSTALLATION
PROCEDURE
1. INSTALL INTAKE MANIFOLD
(a) Set a new gasket on each cylinder head.
NOTICE:
- Align the port holes of the gaskets and cylinder head.
- Make sure that the gaskets are installed in the correct direction.
(b) Set the intake manifold on the cylinder head.
(c) Tighten the 6 bolts and 4 nuts uniformly in several steps.
Torque:
21 N·m {214 kgf·cm, 15 ft·lbf}
HINT:
Tighten the inner installation bolts of the intake manifold before tightening the outer bolts.
2. INSTALL FUEL DELIVERY PIPE SUB-ASSEMBLY
3. CONNECT FUEL TUBE SUB-ASSEMBLY
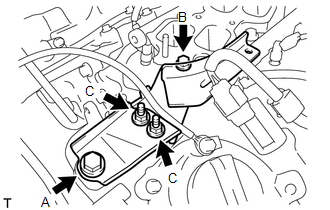
4. INSTALL NO. 2 ENGINE MOUNTING STAY RH
|
(a) Install the No. 2 engine mounting stay RH with the 2 nuts and 2 bolts. Torque: Bolt A : 38 N·m {387 kgf·cm, 28 ft·lbf} Bolt B : 21 N·m {214 kgf·cm, 15 ft·lbf} Nut C : 23 N·m {235 kgf·cm, 17 ft·lbf} |
|
5. INSTALL FUEL HOSE PROTECTOR
6. INSTALL INTAKE AIR SURGE TANK ASSEMBLY
NOTICE:
DO NOT apply oil to the bolts listed below.
|
Tightening Part |
|---|
|
Surge Tank and Intake Manifold |
|
No. 1 Surge Tank Stay and Surge Tank |
|
Throttle Body Bracket and Surge Tank |
(a) Install 3 new air surge tank to intake manifold gaskets to the intake air surge tank assembly.
|
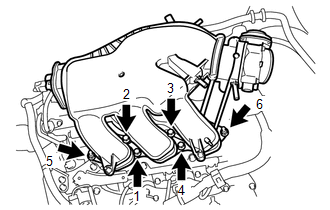
(b) Using a 5 mm socket hexagon wrench, temporarily tighten the 4 bolts to the intake air surge tank assembly. |
|
(c) Temporarily tighten the 2 nuts to the intake air surge tank assembly.
(d) Tighten the 4 bolts and 2 nuts in the order shown in the illustration.
Torque:
Bolt :
18 N·m {184 kgf·cm, 13 ft·lbf}
Nut :
16 N·m {163 kgf·cm, 12 ft·lbf}
(e) Install the throttle body bracket to the intake air surge tank assembly with the bolt.
Torque:
21 N·m {214 kgf·cm, 15 ft·lbf}
(f) Install the No. 1 surge tank stay to the intake air surge tank assembly with the bolt.
Torque:
21 N·m {214 kgf·cm, 15 ft·lbf}
(g) Connect the intake air control valve connector.
(h) Connect the vacuum hose and the hose clamp.
(i) Connect the No. 1 fuel vapor feed hose.
(j) Connect the throttle body connector and wire harness clamp to the throttle with motor body assembly.
|
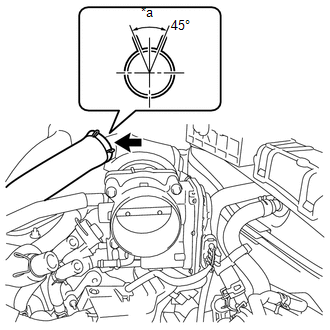
(k) Connect the ventilation hose assembly with the clip. Text in Illustration
HINT: Connect the hose so that the direction of the hose clip is as indicated in the illustration. |
|
(l) Connect the union to check valve hose.
7. INSTALL WATER BY-PASS HOSE
8. INSTALL NO. 2 WATER BY-PASS HOSE
9. ADD ENGINE COOLANT
10. INSPECT FOR COOLANT LEAK
11. INSPECT FOR FUEL LEAK
(a) Check that there are no fuel leaks from the fuel system after doing any maintenance or repairs (See page
![2016 MY Sienna [12/2015 - 08/2016]; 2GR-FE FUEL: FUEL SYSTEM: ON-VEHICLE INSPECTION+](/t3Portal/stylegraphics/info.gif) ).
).
12. INSTALL AIR CLEANER AND HOSE
|
|
|


