| Last Modified: 08-28-2024 | 6.11:8.1.0 | Doc ID: RM100000000VIDX |
| Model Year Start: 2016 | Model: Sienna | Prod Date Range: [12/2015 - 08/2016] |
| Title: 2GR-FE FUEL: FUEL TANK: REMOVAL; 2016 MY Sienna [12/2015 - 08/2016] | ||
REMOVAL
PROCEDURE
1. DISCHARGE FUEL SYSTEM PRESSURE
(See page
![2016 MY Sienna [12/2015 - 08/2016]; 2GR-FE FUEL: FUEL SYSTEM: PRECAUTION](/t3Portal/stylegraphics/info.gif) )
)
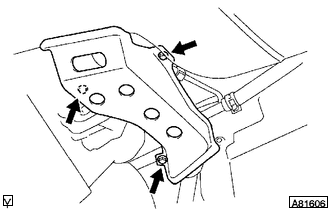
2. REMOVE CHARCOAL CANISTER PROTECTOR
3. DISCONNECT FUEL TANK MAIN TUBE SUB-ASSEMBLY
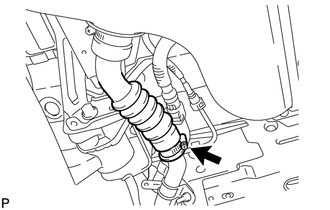
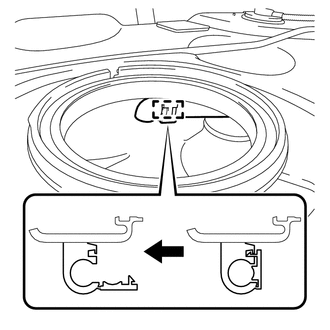
(a) Release the fuel tube connector cover as shown in the illustration.
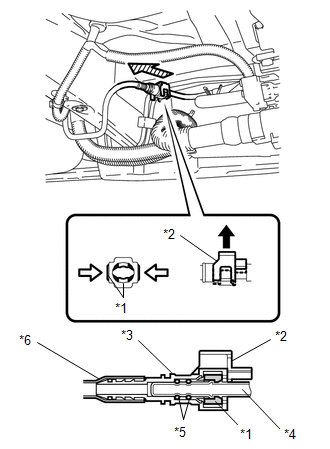
Text in Illustration
|
*1 |
Retainer |
|
*2 |
Fuel Tube Connector Cover |
|
*3 |
Fuel Tube Connector |
|
*4 |
Fuel Pipe |
|
*5 |
O-Ring |
|
*6 |
Nylon Tube |

|
Up |

|
Pinch |

|
Pull Out |
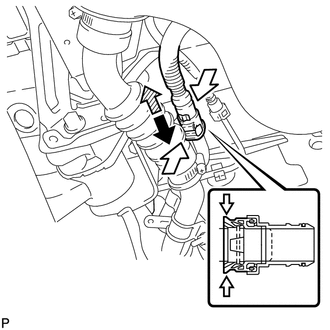
(b) Pinch the retainer to release it as shown in the illustration and disconnect the fuel tank main tube (See page
).
NOTICE:
- Check for dirt or other foreign matter on the parts to be disconnected and clean them if necessary.
- The fuel tube connector seals with an O-ring. Ensure that there is no damage or foreign matter on the contact surface.
- Do not use any tools.
- Do not bend or twist the tubes.
- Protect the contact surface by covering it with a plastic bag.
- If the connector is stuck, push and pull on the parts to separate them.
4. DRAIN FUEL
(a) Operate the fuel pump and drain the fuel from the fuel tank through the fuel tank main tube (See page
).
5. REMOVE CENTER EXHAUST PIPE ASSEMBLY (for 2WD)
|
(a) Remove the 4 bolts and 2 compression springs. |
|
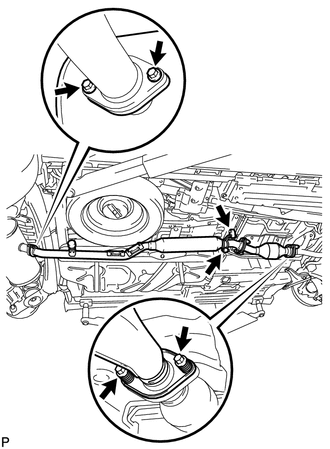
(b) Disconnect the 2 exhaust pipe supports and remove the center exhaust pipe assembly.
(c) Remove the 2 gaskets from the front exhaust pipe assembly and center exhaust pipe assembly.
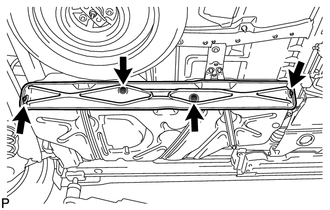
6. REMOVE NO. 1 FUEL TANK HEAT INSULATOR (for 2WD)
|
(a) Remove the 4 nuts and No. 1 fuel tank heat insulator. |
|
7. REMOVE PROPELLER WITH CENTER BEARING SHAFT ASSEMBLY (for AWD)
(See page
)
8. DISCONNECT FUEL TANK VENT HOSE
9. DISCONNECT CHARCOAL CANISTER OUTLET TUBE SUB-ASSEMBLY
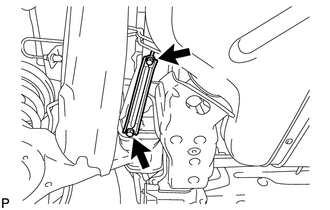
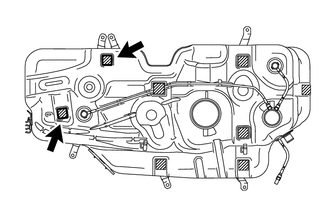
10. REMOVE REAR FLOOR NO. 2 CROSSMEMBER BRACE LH
|
(a) Remove the 2 bolts and the rear floor No. 2 crossmember brace LH. |
|
11. REMOVE FUEL TANK FILLER HOSE COVER
|
(a) Remove the 3 bolts and the fuel tank filler hose cover. |
|
12. REMOVE FUEL TANK ASSEMBLY
|
(a) Disconnect the fuel tank to filler pipe hose. |
|
(b) Disconnect the charcoal canister outlet tube (See page
).
Text in Illustration
|
|
Push |
|
|
Pinch |
|
|
Pull Out |
NOTICE:
- Check for dirt or other foreign matter on the parts to be disconnected and clean them if necessary.
- The fuel tube connector seals with an O-ring. Ensure that there is no damage or foreign matter on the contact surface.
- Do not use any tools.
- Do not bend or twist the tubes.
- Protect the contact surface by covering it with a plastic bag.
- If the connector is stuck, push and pull on the parts to separate them.
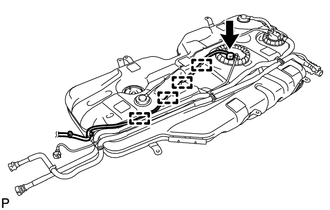
(c) Pinch the retainer to release it as shown in the illustration and disconnect the fuel tube (See page
).
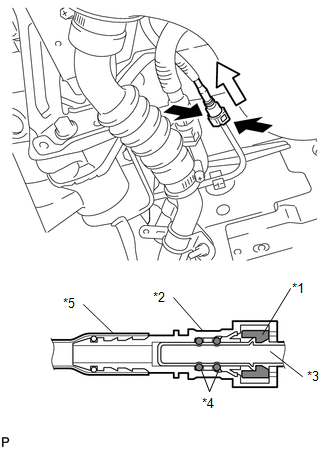
Text in Illustration
|
*1 |
Retainer |
|
*2 |
Fuel Tube Connector |
|
*3 |
Fuel Pipe |
|
*4 |
O-Ring |
|
*5 |
Nylon Tube |
|
|
Pinch |
|
|
Pull Out |
NOTICE:
- Check for dirt or other foreign matter on the parts to be disconnected and clean them if necessary.
- The fuel tube connector seals with an O-ring. Ensure that there is no damage or foreign matter on the contact surface.
- Do not use any tools.
- Do not bend or twist the tubes.
- Protect the contact surface by covering it with a plastic bag.
- If the connector is stuck, push and pull on the parts to separate them.
|
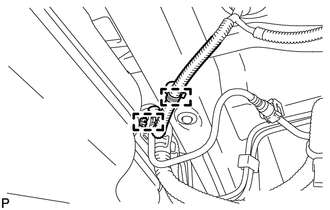
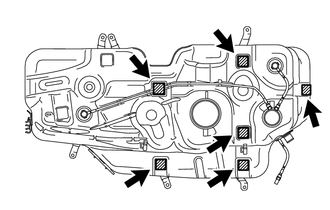
(d) Disengage the 2 wire harness clamps. |
|
|
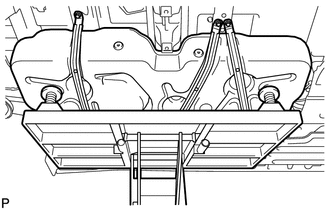
(e) Using an engine lifter, support the fuel tank assembly. |
|
|
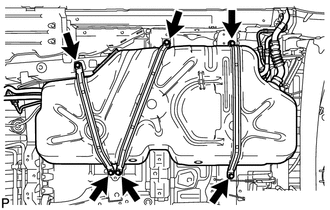
(f) Remove the 6 set bolts of the 3 fuel tank bands. |
|
|
(g) While operating the engine lifter, disengage the 4 guides for the wire harness and disconnect the fuel pump connector, then remove the fuel tank assembly and the 3 fuel tank bands from the vehicle. |
|
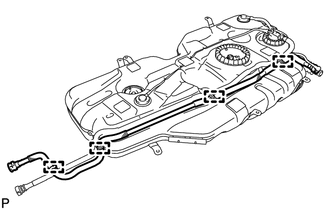
13. REMOVE FUEL TANK MAIN TUBE SUB-ASSEMBLY
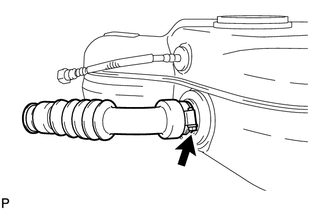
(a) Widen the tip of the tube joint clip and pull out the clip in the direction indicated by the arrow.
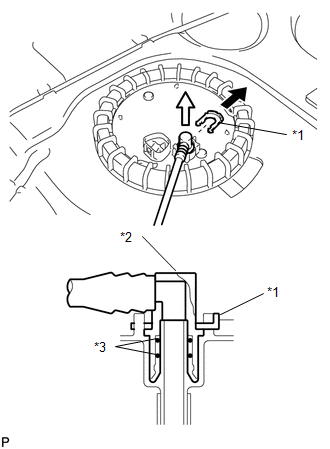
Text in Illustration
|
*1 |
Tube Joint Clip |
|
*2 |
Fuel Tube Connector |
|
*3 |
O-Ring |
|
|
Pull Out |
|
|
Pull |
NOTICE:
- Check for dirt or other foreign matter on the parts to be disconnected and clean them if necessary.
- The fuel tube connector seals with an O-ring. Ensure that there is no damage or foreign matter on the contact surface.
- Do not use any tools.
- Do not bend or twist the tubes.
- Protect the contact surface by covering it with a plastic bag.
- If the connector is stuck, push and pull on the parts to separate them.
|
(b) Disengage the 4 guides and remove the fuel tank main tube sub-assembly. |
|

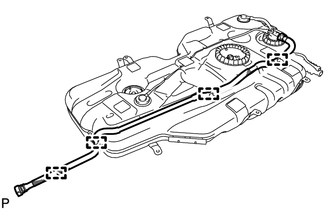
14. REMOVE CHARCOAL CANISTER OUTLET TUBE SUB-ASSEMBLY
|
(a) Disengage the 4 clamps and remove the charcoal canister outlet tube sub-assembly. |
|
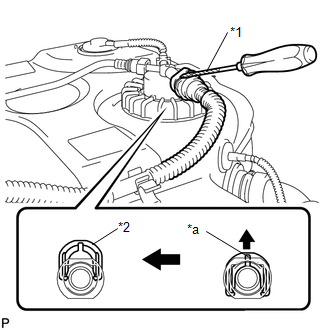
15. REMOVE FUEL TANK VENT HOSE
|
(a) Insert a screwdriver with its tip wrapped in protective tape into the quick connector cutout as shown in the illustration, pry up the retainer and disconnect the fuel tank vent hose. Text in Illustration
NOTICE:
|
|
|
(b) Disengage the 4 clamps and remove the fuel tank vent hose and hose clamp. |
|
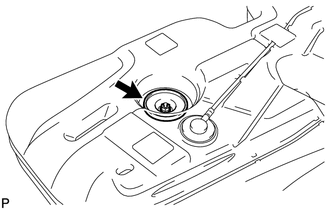
16. REMOVE FUEL PUMP GAUGE RETAINER
|
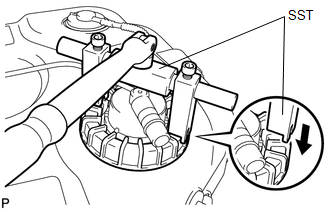
(a) Using SST, loosen the retainer. SST: 09808-14020 09808-01410 09808-01420 09808-01430 NOTICE:
HINT: Align the ribs of the fuel pump gauge retainer with the tips of SST. |
|
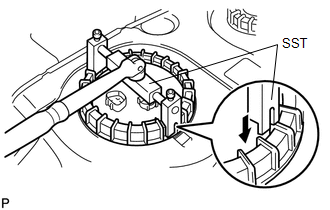
(b) Remove the fuel pump gauge retainer while holding the fuel suction with pump and gauge tube assembly by hand.
17. REMOVE FUEL SUCTION WITH PUMP AND GAUGE TUBE ASSEMBLY
(a) Remove the fuel suction with pump and gauge tube assembly from the fuel tank.
NOTICE:
Do not bend the arm of the sender gauge.
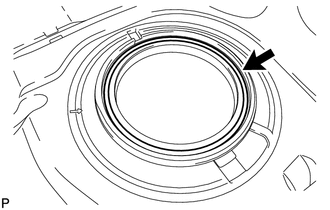
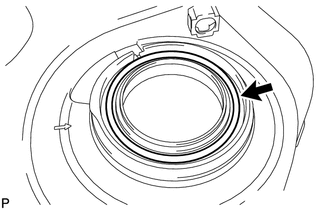
18. REMOVE FUEL SUCTION TUBE SET GASKET
|
(a) Remove the gasket from the fuel tank. |
|
19. REMOVE FUEL TANK OVERFILL CHECK VALVE ASSEMBLY
(a) Pinch the retainer to release it as shown in the illustration and disconnect the fuel tube (See page
).
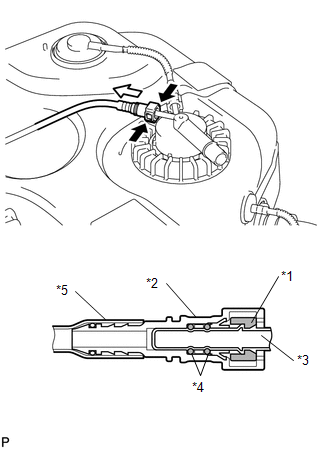
Text in Illustration
|
*1 |
Retainer |
|
*2 |
Fuel Tube Connector |
|
*3 |
Fuel Pipe |
|
*4 |
O-Ring |
|
*5 |
Nylon Tube |
|
|
Pinch |
|
|
Pull Out |
NOTICE:
- Check for dirt or other foreign matter on the parts to be disconnected and clean them if necessary.
- The fuel tube connector seals with an O-ring. Ensure that there is no damage or foreign matter on the contact surface.
- Do not use any tools.
- Do not bend or twist the tubes.
- Protect the contact surface by covering it with a plastic bag.
- If the connector is stuck, push and pull on the parts to separate them.
(b) Pinch the retainer to release it as shown in the illustration and disconnect the fuel tube (See page
).
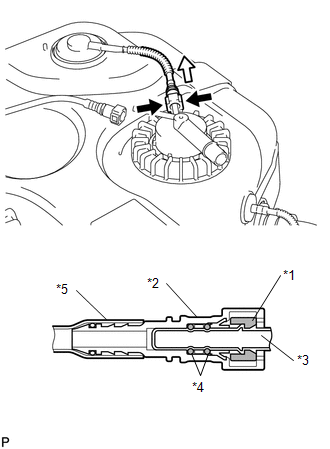
Text in Illustration
|
*1 |
Retainer |
|
*2 |
Fuel Tube Connector |
|
*3 |
Fuel Pipe |
|
*4 |
O-Ring |
|
*5 |
Nylon Tube |
|
|
Pinch |
|
|
Pull Out |
NOTICE:
- Check for dirt or other foreign matter on the parts to be disconnected and clean them if necessary.
- The fuel tube connector seals with an O-ring. Ensure that there is no damage or foreign matter on the contact surface.
- Do not use any tools.
- Do not bend or twist the tubes.
- Protect the contact surface by covering it with a plastic bag.
- If the connector is stuck, push and pull on the parts to separate them.
|
(c) Disengage the hose clamp. |
|
|
(d) Using SST, loosen the retainer. SST: 09808-14020 09808-01410 09808-01420 09808-01430 HINT: Align the ribs of the fuel pump gauge retainer with the tips of SST. NOTICE: Remove foreign matter around the fuel tank overfill check valve assembly before this operation. |
|
(e) Remove the fuel tank overfill check valve assembly.
20. REMOVE NO. 1 FUEL SUCTION TUBE SET GASKET
|
(a) Remove the gasket from the fuel tank. |
|
21. REMOVE FUEL TANK TO FILLER PIPE HOSE
|
(a) Remove the fuel tank to filler pipe hose from the fuel tank. |
|
22. REMOVE FUEL TANK SIDE PLATE
|
(a) Remove the nut, bolt, fuel tank side plate and fuel tank bracket sub-assembly. |
|
23. REMOVE NO. 2 FUEL TANK CUSHION
|
(a) Remove the 2 No. 2 fuel tank cushions. |
|
24. REMOVE FUEL TANK CUSHION
|
(a) Remove the 6 fuel tank cushions. |
|
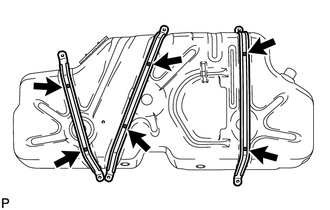
25. REMOVE FUEL TANK BAND
|
(a) Remove the 6 clips and 3 fuel tank bands. |
|
|
|
|