| Last Modified: 08-28-2024 | 6.11:8.1.0 | Doc ID: RM100000000VICS |
| Model Year Start: 2016 | Model: Sienna | Prod Date Range: [12/2015 - 08/2016] |
| Title: 2GR-FE ENGINE MECHANICAL: CAMSHAFT: REMOVAL; 2016 MY Sienna [12/2015 - 08/2016] | ||
REMOVAL
PROCEDURE
1. REMOVE AUTOMATIC TRANSAXLE ASSEMBLY (for 2WD)
(See page
![2016 MY Sienna [12/2015 - 08/2016]; U660E (AUTOMATIC TRANSMISSION / TRANSAXLE): AUTOMATIC TRANSAXLE ASSEMBLY(When Not Using the Engine Support Bridge): REMOVAL](/t3Portal/stylegraphics/info.gif) )
)
2. REMOVE AUTOMATIC TRANSAXLE ASSEMBLY (for AWD)
(See page
)
3. REMOVE DRIVE PLATE AND RING GEAR SUB-ASSEMBLY
4. INSTALL ENGINE ON ENGINE STAND
5. REMOVE ENGINE HANGER
6. REMOVE IGNITION COIL ASSEMBLY
(See page
)
7. REMOVE INTAKE MANIFOLD
(See page
)
8. REMOVE EXHAUST MANIFOLD SUB-ASSEMBLY
(See page
)
9. REMOVE V-RIBBED BELT TENSIONER ASSEMBLY
10. REMOVE NO. 2 TIMING GEAR COVER
11. REMOVE WATER PUMP PULLEY
12. REMOVE NO. 2 IDLER PULLEY SUB-ASSEMBLY
13. REMOVE NO. 1 VACUUM SWITCHING VALVE ASSEMBLY
14. REMOVE CRANKSHAFT POSITION SENSOR
15. REMOVE NO. 1 OIL PIPE
16. REMOVE OIL PIPE
17. REMOVE CRANKSHAFT PULLEY
18. REMOVE FRONT NO. 1 ENGINE MOUNTING BRACKET LH
19. REMOVE WATER INLET HOUSING
20. REMOVE CYLINDER HEAD COVER SUB-ASSEMBLY (for Bank 1)
21. REMOVE CYLINDER HEAD COVER SUB-ASSEMBLY LH (for Bank 2)
22. REMOVE NO. 2 OIL PAN SUB-ASSEMBLY
23. REMOVE OIL STRAINER SUB-ASSEMBLY
24. REMOVE OIL PAN SUB-ASSEMBLY
25. REMOVE TIMING CHAIN COVER SUB-ASSEMBLY
26. REMOVE TIMING GEAR CASE OR TIMING CHAIN CASE OIL SEAL
27. SET NO. 1 CYLINDER TO TDC/COMPRESSION
28. REMOVE NO. 1 CHAIN TENSIONER ASSEMBLY
29. REMOVE CHAIN TENSIONER SLIPPER
30. REMOVE CHAIN SUB-ASSEMBLY
31. REMOVE IDLE SPROCKET ASSEMBLY
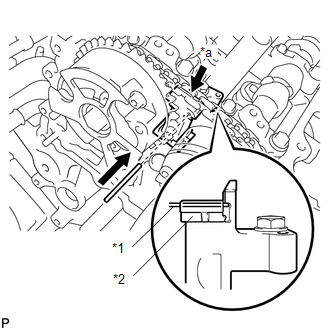
32. REMOVE CAMSHAFT TIMING GEARS AND NO. 2 CHAIN (for Bank 1)
|
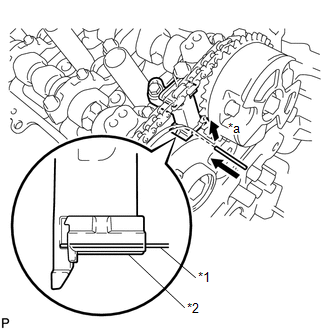
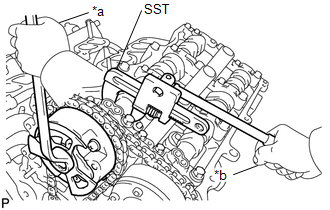
(a) While raising the No. 2 chain tensioner assembly, insert a pin of 1.0 mm (0.0394 in.) diameter into the hole to hold the No. 2 chain tensioner assembly. Text in Illustration
|
|
|
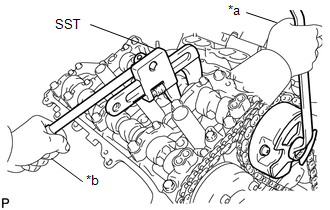
(b) Using SST to hold the hexagonal portion of each camshaft, loosen the flange bolts of the camshaft timing gear assembly and the camshaft timing exhaust gear assembly RH. Text in Illustration
SST: 09922-10010 NOTICE:
|
|
(c) Remove the 2 bolts and the camshaft timing gear assembly together with the No. 2 chain.
33. REMOVE NO. 2 CHAIN TENSIONER ASSEMBLY
|
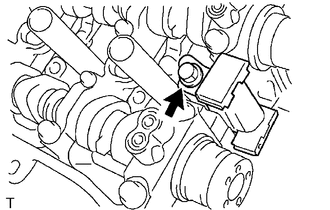
(a) Remove the bolt and No. 2 chain tensioner assembly. |
|
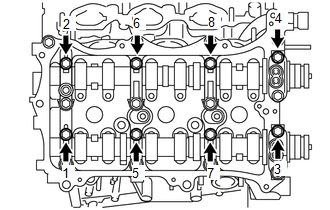
34. REMOVE CAMSHAFT BEARING CAP (for Bank 1)
|
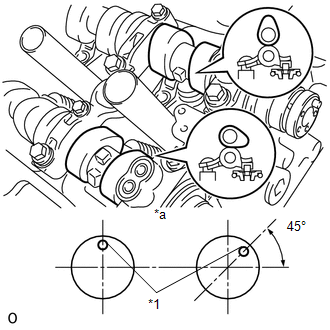
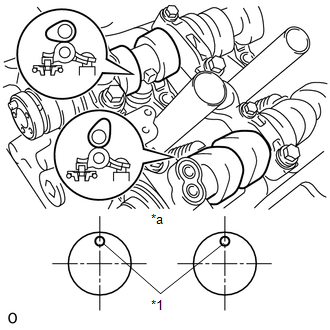
(a) Check that the camshafts are positioned as shown in the illustration. Text in Illustration
|
|
|
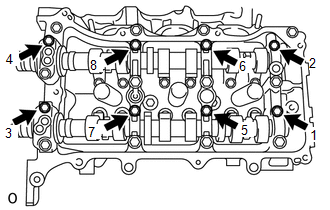
(b) Uniformly loosen and remove the 8 bearing cap bolts in several steps and in the sequence shown in the illustration. |
|
|
(c) Uniformly loosen and remove the 12 bearing cap bolts in several steps and in the sequence shown in the illustration. NOTICE: Uniformly loosen the bolts while keeping the camshaft level. |
|
(d) Remove the 5 camshaft bearing caps.
35. REMOVE CAMSHAFT
(a) Remove the camshaft.
36. REMOVE NO. 2 CAMSHAFT
(a) Remove the No. 2 camshaft.
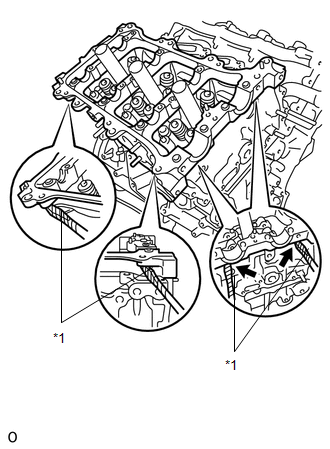
37. REMOVE CAMSHAFT HOUSING SUB-ASSEMBLY RH
|
(a) Remove the camshaft housing sub-assembly RH by prying between the cylinder head and camshaft housing sub-assembly RH with a screwdriver. Text in Illustration
NOTICE: Be careful not to damage the contact surfaces of the cylinder head and camshaft housing sub-assembly RH. HINT: Tape the screwdriver tip before use. |
|
38. REMOVE CAMSHAFT TIMING GEARS AND NO. 2 CHAIN (for Bank 2)
|
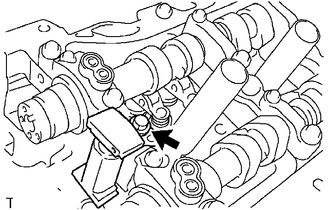
(a) While pushing down the No. 3 chain tensioner assembly, insert a pin of 1.0 mm (0.0394 in.) diameter into the hole to hold the No. 3 chain tensioner assembly. Text in Illustration
|
|
|
(b) Using SST to hold the hexagonal portion of each camshaft, loosen the flange bolts of the camshaft timing gear assembly and the camshaft timing exhaust gear assembly LH. Text in Illustration
SST: 09922-10010 NOTICE:
|
|
(c) Remove the 2 bolts and the camshaft timing gear together with the No. 2 chain.
39. REMOVE NO. 3 CHAIN TENSIONER ASSEMBLY
|
(a) Remove the bolt and No. 3 chain tensioner assembly. |
|
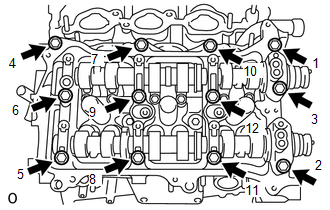
40. REMOVE CAMSHAFT BEARING CAP (for Bank 2)
|
(a) Check that the camshafts are positioned as shown in the illustration. Text in Illustration
|
|
|
(b) Uniformly loosen and remove the 8 bearing cap bolts in several steps and in the sequence shown in the illustration. |
|
|
(c) Uniformly loosen and remove the 13 bearing cap bolts in several steps and in the sequence shown in the illustration. NOTICE: Uniformly loosen the bolts while keeping the camshaft level. |
|
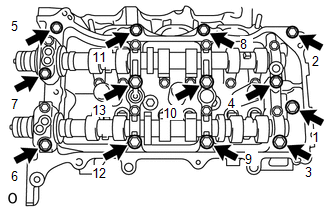
(d) Remove the 5 camshaft bearing caps.
41. REMOVE NO. 3 CAMSHAFT
(a) Remove the No. 3 camshaft.
42. REMOVE NO. 4 CAMSHAFT
(a) Remove the No. 4 camshaft.
43. REMOVE CAMSHAFT HOUSING SUB-ASSEMBLY LH
|
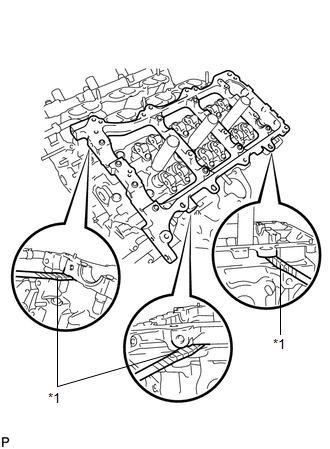
(a) Remove the camshaft housing sub-assembly LH by prying between the cylinder head and camshaft housing sub-assembly LH with a screwdriver. Text in Illustration
NOTICE: Be careful not to damage the contact surfaces of the cylinder head and camshaft housing sub-assembly LH. HINT: Tape the screwdriver tip before use. |
|
|
|
|