| Last Modified: 08-28-2024 | 6.11:8.1.0 | Doc ID: RM100000000VICQ |
| Model Year Start: 2016 | Model: Sienna | Prod Date Range: [12/2015 - 08/2016] |
| Title: 2GR-FE ENGINE MECHANICAL: CAMSHAFT: INSTALLATION; 2016 MY Sienna [12/2015 - 08/2016] | ||
INSTALLATION
PROCEDURE
1. INSTALL NO. 3 CAMSHAFT
(a) Apply a light coat of engine oil to the No. 3 camshaft journals and camshaft housing sub-assembly LH.
(b) Install the No. 3 camshaft to the camshaft housing sub-assembly LH.
2. INSTALL NO. 4 CAMSHAFT
(a) Apply a light coat of engine oil to the No. 4 camshaft journals and camshaft housing sub-assembly LH.
(b) Install the No. 4 camshaft to the camshaft housing sub-assembly LH.
3. INSTALL CAMSHAFT BEARING CAP (for Bank 2)
(a) Apply engine oil to the camshaft bearing caps.
|
(b) Make sure of the marks and numbers on the camshaft bearing caps and place them in each proper position and direction. |
|
|
(c) Temporarily tighten the 8 bolts in the order shown in the illustration. Torque: 10 N·m {102 kgf·cm, 7 ft·lbf} |
|
4. INSTALL CAMSHAFT HOUSING SUB-ASSEMBLY LH
|
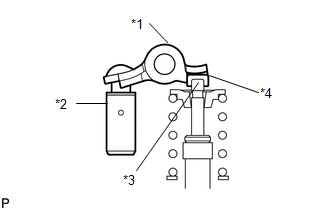
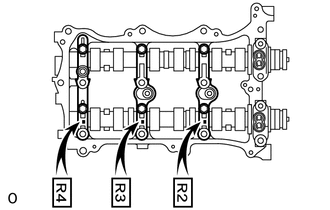
(a) Make sure that the valve rocker arm is installed as shown in the illustration. Text in Illustration
|
|
|
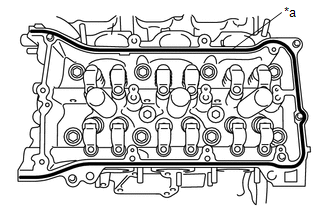
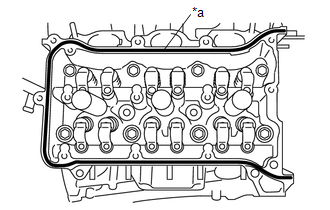
(b) Apply seal packing in a continuous line as shown in the illustration. Text in Illustration
Seal packing: Toyota Genuine Seal Packing Black, Three Bond 1207B or equivalent Seal diameter: 3.5 to 4.5 mm (0.138 to 0.177 in.) NOTICE:
|
|
|
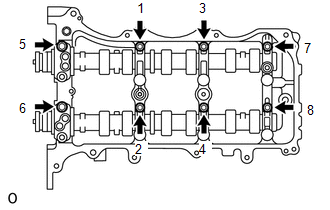
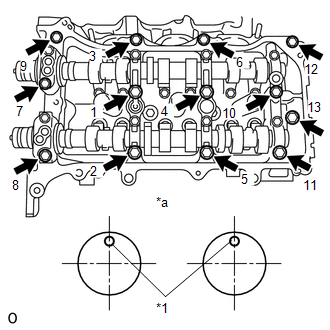
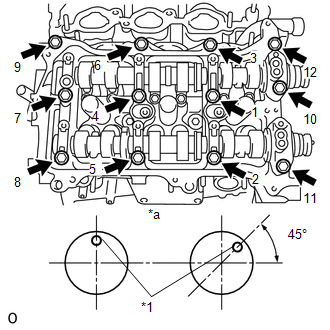
(c) Install the camshaft housing sub-assembly LH and tighten the 13 bolts in the order shown in the illustration. Text in Illustration
Torque: 28 N·m {286 kgf·cm, 21 ft·lbf} NOTICE:
|
|
|
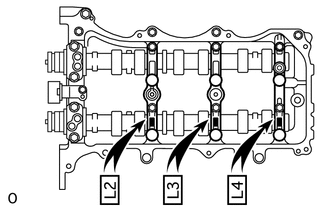
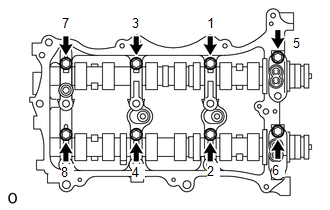
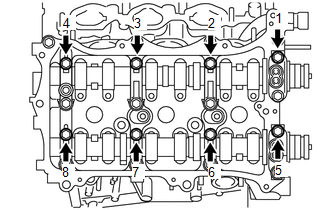
(d) Tighten the 8 bolts in the order shown in the illustration. Torque: 16 N·m {163 kgf·cm, 12 ft·lbf} |
|
5. INSTALL CAMSHAFT
(a) Apply a light coat of engine oil to the camshaft journals and camshaft housing sub-assembly RH.
(b) Install the camshaft to the camshaft housing sub-assembly RH.
6. INSTALL NO. 2 CAMSHAFT
(a) Apply a light coat of engine oil to the No. 2 camshaft journals and camshaft housing sub-assembly RH.
(b) Install the No. 2 camshaft to the camshaft housing sub-assembly RH.
7. INSTALL CAMSHAFT BEARING CAP (for Bank 1)
(a) Apply engine oil to the camshaft bearing caps.
|
(b) Make sure of the marks and numbers on the camshaft bearing caps and place them in each proper position and direction. |
|
|
(c) Temporarily tighten the 8 bearing cap bolts in the order shown in the illustration. Torque: 10 N·m {102 kgf·cm, 7 ft·lbf} |
|
8. INSTALL CAMSHAFT HOUSING SUB-ASSEMBLY RH
|
(a) Make sure that the No. 1 valve rocker arm sub-assembly is installed as shown in the illustration. Text in Illustration
|
|
|
(b) Apply seal packing in a continuous line as shown in the illustration. Text in Illustration
Seal packing: Toyota Genuine Seal Packing Black, Three Bond 1207B or equivalent Seal diameter: 3.5 to 4.5 mm (0.138 to 0.177 in.) NOTICE:
|
|
|
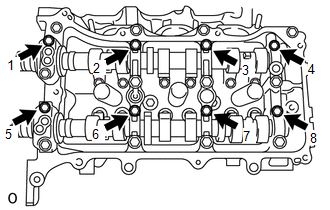
(c) Install the camshaft housing sub-assembly RH and tighten the 12 bolts in the order shown in the illustration. Text in Illustration
Torque: 28 N·m {286 kgf·cm, 21 ft·lbf} NOTICE:
|
|
|
(d) Tighten the 8 bolts in the order shown in the illustration. Torque: 16 N·m {163 kgf·cm, 12 ft·lbf} |
|
9. INSTALL NO. 3 CHAIN TENSIONER ASSEMBLY
|
(a) Install the No. 3 chain tensioner assembly with the bolt. Torque: 21 N·m {214 kgf·cm, 15 ft·lbf} |
|
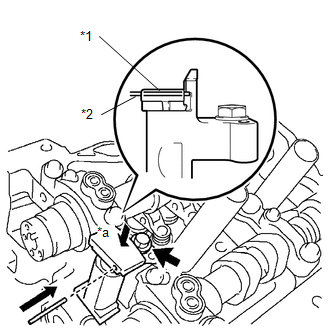
(b) While pushing in the tensioner, insert a pin of 1.0 mm (0.0394 in.) diameter into the hole to hold it.
Text in Illustration
|
*1 |
Plunger |
|
*2 |
Pin |
|
*a |
Push |
10. INSTALL CAMSHAFT TIMING GEARS AND NO. 2 CHAIN (for Bank 2)
|
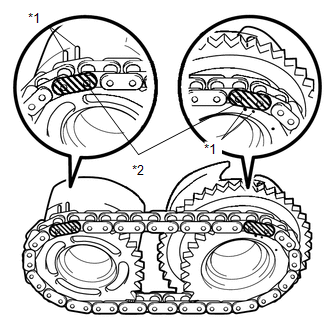
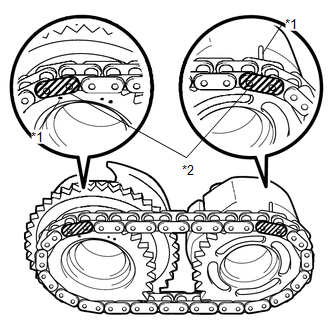
(a) Align the mark plates (yellow) with the timing marks of the camshaft timing gear assemblies as shown in the illustration. Text in Illustration
|
|
(b) Apply a light coat of engine oil to the bolt threads and bolt-seating surface.
(c) Align the knock pin of the camshaft with the pin hole of the camshaft timing gear assembly. Install the camshaft timing gear assembly and camshaft timing exhaust gear LH with the No. 2 chain sub-assembly installed.
|
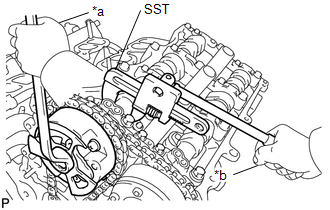
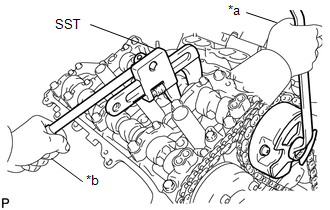
(d) Using SST to hold the hexagonal portion of each camshaft, tighten the flange bolts of the camshaft timing gear assembly and the camshaft timing exhaust gear assembly LH. Text in Illustration
SST: 09922-10010 Torque: 100 N·m {1020 kgf·cm, 74 ft·lbf} |
|
(e) Remove the pin from the No. 3 chain tensioner assembly.
11. INSTALL NO. 2 CHAIN TENSIONER ASSEMBLY
|
(a) Install the No. 2 chain tensioner assembly with the bolt. Torque: 21 N·m {214 kgf·cm, 15 ft·lbf} |
|
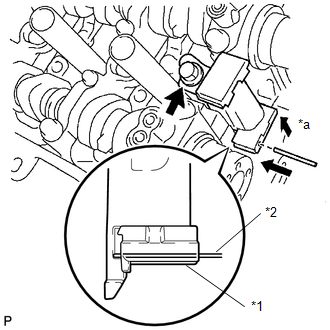
(b) While pushing in the No. 2 chain tensioner assembly, insert a pin of 1.0 mm (0.0394 in.) diameter into the hole to hold it.
Text in Illustration
|
*1 |
Plunger |
|
*2 |
Pin |
|
*a |
Push |
12. INSTALL CAMSHAFT TIMING GEARS AND NO. 2 CHAIN (for Bank 1)
|
(a) Align the mark plates (yellow) with the timing marks of the camshaft timing gear assemblies as shown in the illustration. Text in Illustration
|
|
(b) Apply a light coat of engine oil to the bolt threads and bolt-seating surface.
(c) Align the knock pin of the camshaft with the pin hole of the camshaft timing gear assembly. Install the camshaft timing gear assembly and camshaft timing exhaust gear assembly with the No. 2 chain sub-assembly installed.
|
(d) Using SST to hold the hexagonal portion of each camshaft, tighten the flange bolts of the camshaft timing gear assembly and the camshaft timing exhaust gear assembly RH. Text in Illustration
SST: 09922-10010 Torque: 100 N·m {1020 kgf·cm, 74 ft·lbf} |
|
(e) Remove the pin from the No. 2 chain tensioner assembly.
13. INSTALL IDLE SPROCKET ASSEMBLY
![2016 MY Sienna [12/2015 - 08/2016]; 2GR-FE ENGINE MECHANICAL: ENGINE UNIT: REASSEMBLY+](/t3Portal/stylegraphics/info.gif)
14. INSTALL CHAIN SUB-ASSEMBLY
15. INSTALL CHAIN TENSIONER SLIPPER
16. INSTALL NO. 1 CHAIN TENSIONER ASSEMBLY
17. INSPECT VALVE TIMING
18. INSTALL TIMING GEAR CASE OR TIMING CHAIN CASE OIL SEAL
19. INSTALL TIMING CHAIN COVER SUB-ASSEMBLY
20. INSTALL WATER INLET HOUSING
21. INSTALL FRONT NO. 1 ENGINE MOUNTING BRACKET LH
22. INSTALL OIL PAN SUB-ASSEMBLY
23. INSTALL OIL STRAINER SUB-ASSEMBLY
24. INSTALL NO. 2 OIL PAN SUB-ASSEMBLY
25. INSTALL CYLINDER HEAD COVER SUB-ASSEMBLY (for Bank 1)
26. INSTALL CYLINDER HEAD COVER SUB-ASSEMBLY LH (for Bank 2)
27. INSTALL CRANKSHAFT PULLEY
28. INSTALL NO. 1 OIL PIPE
29. INSTALL OIL PIPE
30. INSTALL CRANKSHAFT POSITION SENSOR
31. INSTALL NO. 1 VACUUM SWITCHING VALVE ASSEMBLY
32. INSTALL WATER PUMP PULLEY
33. INSTALL NO. 2 IDLER PULLEY SUB-ASSEMBLY
34. INSTALL NO. 2 TIMING GEAR COVER
35. INSTALL V-RIBBED BELT TENSIONER ASSEMBLY
36. INSTALL EXHAUST MANIFOLD SUB-ASSEMBLY
(See page
)
37. INSTALL INTAKE MANIFOLD
(See page
)
38. INSTALL IGNITION COIL ASSEMBLY
(See page
)
39. INSTALL ENGINE HANGER
40. REMOVE ENGINE FROM ENGINE STAND
41. INSTALL DRIVE PLATE AND RING GEAR SUB-ASSEMBLY
42. INSTALL AUTOMATIC TRANSAXLE ASSEMBLY (for 2WD)
(See page
)
43. INSTALL AUTOMATIC TRANSAXLE ASSEMBLY (for AWD)
(See page
)
|
|
|